![]()
![]()
![]()
![]()
Any user can add, edit, or delete the widgets that exist in their dashboards. By default, when a dashboard is created, it is populated with default widgets.
 To add widgets
Open the dashboard.
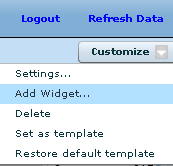
In the upper right corner of the dashboard, click Customize, and then click Add Widget.
Specify a name for the widget in the What Do You Want To Name This Widget field.
Specify the resource in the Which Resource Are You Interested In field.
Choose one of the following display types for the What Kind Of Display Do You Want field.
Table display The table display provides a general outline of the relative values. This display type provides sparklines—simple graphs that are good for showing trends and variations. The table display is the default display type.
Graph display The graph display is more detailed and is useful for determining exact values at specific times. For example, you notice an unusual peak in a sparkline. To find out more information, such as when a peak occurred, add a widget that uses the graph display to display one or two metrics.
Follow the instructions in the Add Widget window to add a widget.
For information about a specific metric, see List of metrics.
Click Create.
To edit or delete a widgetIn the widget pane, click the dropdown arrow in the upper right corner of the widget, and then choose either:
Settings Edits the widget's settings.
Delete Deletes the widget.
See also |
Discuss this page in DocCommentXchange.
|
Copyright © 2010, iAnywhere Solutions, Inc. - SQL Anywhere 12.0.0 |