Generate a Mobile Workflow package, customize it, and deploy it to Unwired Server to make it available to device clients.
Prerequisites
Complete these
tasks:- Registering the Device in Sybase Control Center for each device that you want to enable to connect to the package.
- Complete Developing a Database Mobile Business Object.
- Complete Creating a Mobile Workflow Form.
- For Windows Mobile devices, start the synchronization software
if it is not already running:
- On Windows XP, start Microsoft ActiveSync.
- Windows Vista, Windows 7, or Windows 2008, start Windows Mobile Device Center.
Task
Use the Mobile Workflow Package Generation wizard to generate
files for the mobile workflow package, deploy the generated package files to the server,
and assign the package to one or more devices. Then, perform a simple customization by
adding a header image to the generated package. - In the Sybase Unwired Workspace toolbar, click the
Mobile Workflow package wizard button.
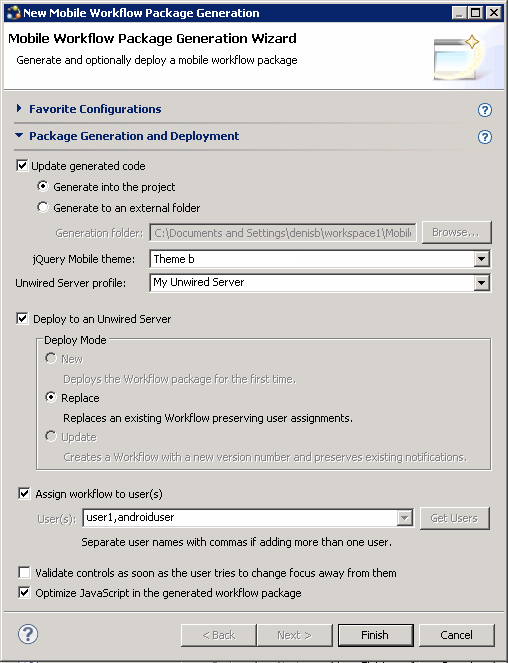
- In the New Mobile Workflow Package Generation wizard, select
these options:
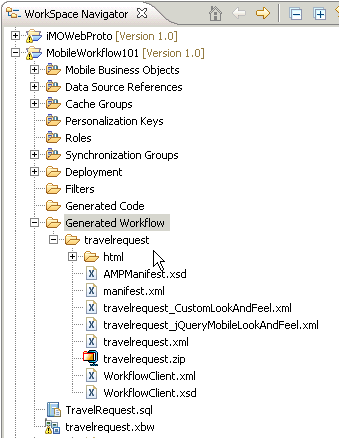
Option Description Update generated code Select Generate into the project. Unwired Server Profile Select My Unwired Server as the profile to associate with the mobile workflow package. Deploy to an Unwired Server Select this option. Assign workflow to users Select this option and click Get Users to choose one or more registered users for whom you want to deploy the package. Multiple users are separated by commas. Optimize JavaScript in the generated workflow package The public JavaScript files (API.js, Callbacks.js, Camera.js, and so on) contain the client API functions that you can access for use with your Mobile Workflow package customization. By default, the wizard generates a single JavaScript file (such as SUP0.js, SUP1.js, or SUP2.js), that concatenates these files. Unselect this option if you prefer to use the JavaScript files separately. Note: If you are deploying to a BlackBerry or later device, selecting this option can make the workflow open more quickly. - Click Finish.The WorkSpace assigns the TravelRequest application to the user and generates the files for the mobile workflow package in a zip archive on the server. You can see the files in your project in the Workspace Navigator:
If the package is not displayed initially, double-click the server to refresh the display.
- Add a header image to your application.
- Copy the image that you want to use in your header to Generated Workflow\travelrequest\html in your project folder.
- In Workspace Navigator, open the file, Generated Workflow\travelrequest\html\js\Custom.js for editing.
- In Custom.js, modify the customAfterWorkflowLoad()
method to include this JavaScript:
function customAfterWorkflowLoad() {
  var screenKey = getCurrentScreen();
  var form = document.forms[screenKey + "Form"];
  if (form) {
    var topOfFormElem = document.getElementById("topOf" + screenKey + "Form");
    topOfFormElem.innerHTML = '<img alt="header" src="header.png">';
  }
}
Note: For the src value, use the name of the image file that you saved in Step a. - Save your changes to Custom.js.