![]()
![]()
![]()
![]()
In this section, you:
First you select a data source and define how the data is to be presented.
![]() To select the data source
and style:
To select the data source
and style:
Click the New button in the PowerBar, select FreeForm from the list of presentation styles, and click OK.
Select SQL Select as the data source and select Retrieve On Preview if it is not already selected.
Since the data source is SQL Select, you go to the Select painter, and the Select Tables dialog box displays.
Selecting the Retrieve On Preview check box allows you to view the data returned by a query in the development environment, but you need to provide initial values for any retrieval arguments that you specify.
Click Next.
Now you select the table and the columns from that table to use in the DataWindow object.
![]() To select the table and
columns:
To select the table and
columns:
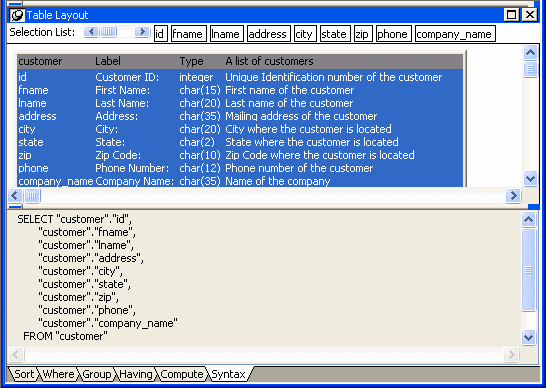
Select customer in the list of tables and click Open.
The Select painter displays the customer table and its columns.
Right-click the header area of the Customer table in the Table Layout view and choose Select All from the pop-up menu.
The column names appear in the Selection List area above the table in the Table Layout view.
The column order in the Selection List reflects the order in which columns are selected. Since you selected all the columns at once, the order displayed is the original order of the columns in the database. You will change the column presentation order later.
You can also see the order of selection in the Syntax view. Click the Syntax tab to display the Syntax view, which displays the generated Select statement.
Now define a retrieval argument.
![]() To define a retrieval
argument:
To define a retrieval
argument:
Select Design>Retrieval Arguments from the menu bar.
The Specify Retrieval Arguments dialog box displays.
Type cust_id in
the Name box.
The default data type is Number, which is what this exercise requires.
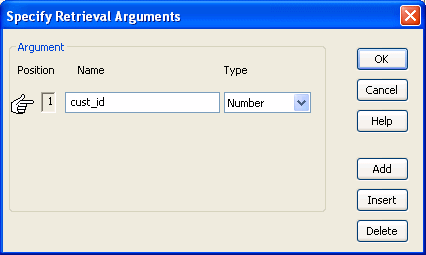
Click OK.
The retrieval argument is defined.
You need to specify a WHERE clause using the retrieval argument to retrieve a specific customer.
![]() To specify a WHERE clause:
To specify a WHERE clause:
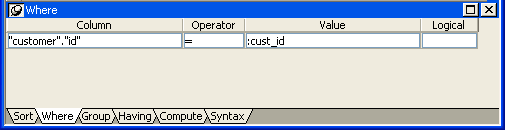
Click the Where tab at the bottom of the Select painter.
Click in the box below Column in the Where tab page.
A down arrow displays, and the box becomes a drop-down list box.
Click the down arrow and select "customer"."id".
Your selection displays immediately below the Column heading. An equal sign (=) appears in the Operator box. This is what you need for this tutorial, so do not change it.
Right-click in the box below the Value column header on the Where tab page.
Select Arguments from the pop-up menu, select :cust_id,
and click Paste.
Click the Syntax tab.
The Syntax tab page displays the modified SELECT statement.
Scroll down until you see the generated WHERE clause.
You have now created a complete SQL SELECT statement that retrieves data from several columns in the customer table where the id column is equal to an argument that will be supplied at runtime.
You can view the DataWindow in the DataWindow painter using the Design and Preview views.
![]() To view the DataWindow
in the DataWindow painter:
To view the DataWindow
in the DataWindow painter:
Click the Return button in the PainterBar or select File>Return To DataWindow Painter from the menu bar.
The DataWindow wizard asks you to select the borders and colors for the new DataWindow object.
Select Raised from the Border drop-down list box for columns.
Click Next.
You have added raised borders to the columns, but not to the labels in the DataWindow object. The DataWindow wizard summarizes your selections.
Click Finish.
Because you selected the Retrieve On Preview check box and because the Preview view is part of the default layout scheme for the DataWindow painter, the Specify Retrieval Arguments dialog box appears.
This dialog box prompts you for an argument value. When you put this DataWindow object into the tutorial application, you write code that passes the required argument to the DataWindow object automatically.
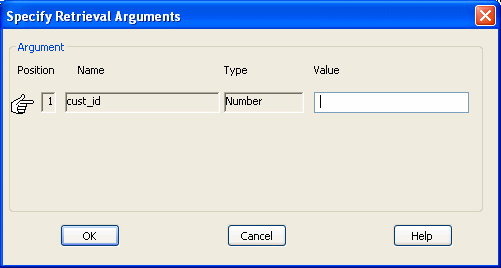
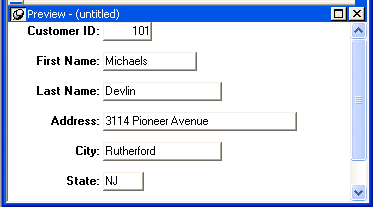
Type a customer ID (such as 101, 102, or 103) in the Value field.
Click OK.
The DataWindow painter opens. The Design view displays the new DataWindow object, and the Preview view retrieves the requested customer data.
Now name the DataWindow object and save it.
![]() To save the DataWindow
object:
To save the DataWindow
object:
Select File>Save from the menu bar.
The Save DataWindow dialog box displays.
Type d_customer in
the DataWindows box.
Earlier you saved a DataWindow object as d_custlist.
(Optional) Type the following comments in the Comments box.
This DataWindow retrieves all columns for the Customer table. It is useful as a detail DataWindow.
Click OK.
You return to the DataWindow painter.
