Generating Code for Unit Testing

You can run the tests using NUnit or Visual Studio Test System. PowerDesigner provides support for unit test code generation through an extension file.

If there are many persistent classes, it can be difficult to test them all to prove that:
  • The mappings are correctly defined

  • The CRUD (Create, Read, Update, Delete) options work

  • The find methods work

  • The navigations work

Usually, developers have to develop unit tests or user-interfaces in order to test these objects. PowerDesigner can automate this time-consuming process by using the NUnit or Visual Studio Test System (VSTS) to generate the unit test classes. Most code generated for these two UnitTest frameworks is very similar. The main differences are:
  • Team Test use different attributes with NUnit in test class, such as [TestClass()] to [TestFixture] and [TestMethod()] to [Test] etc.

  • AllTests file is not generated because all tests will be run in Visual Studio gui or command prompt.

  • Log4net is replaced by test result .trx file that can be opened in Test Result window in Visual Studio.

Some conditions must be met to unit test for a class:
  • Mapping of the class should be defined.

  • The class can be instantiated. Unit test classes cannot be generated for abstract classes.

  • The class is not a value type.

  • The Mutable property is set to true. If Mutable is set to false, the class can not be updated or deleted.

  • The class has no unfulfilled foreign key constraints. If any foreign key is mandatory, the parent class should be reachable (navigable on the parent class side) for testing.

To enable the unit test extensions in your model, select Model > Extensions, click the Import tool, select the UnitTest.NET or UnitTest.NET CF file (on the Unit Test tab), and click OK to attach it.

Before generating code for UnitTest, you must have NUnit 2.2.3 or higher installed (available at http://www.nunit.org).

  1. Select Tools > Check Model to verify if there are errors or warnings in the model. If there are errors, fix them before continuing with code generation.
  2. Select Tools > General Options, and click the Variables node.
  3. Add a variable NUNIT_HOME and, in the value field, enter the NUnit home directory path. For example, D:\NUnit2.2.3\bin. Add a variable LOG4NET_HOME in the same way if log4net is going to be used for logging.


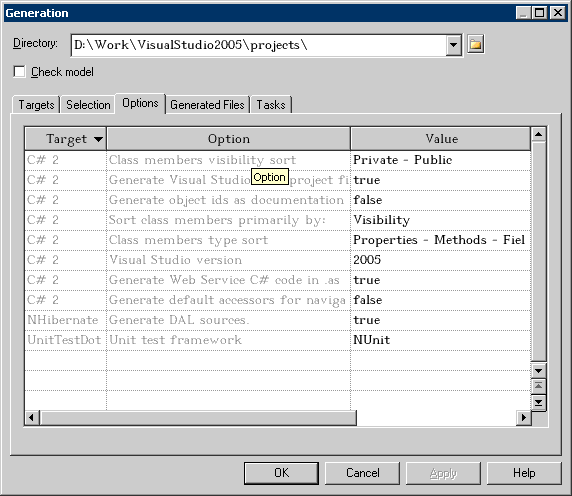
  4. Select Language > Generate C# 2 Code or Generate Visual Basic 2005 Code to open the Generation dialog box.
  5. Specify the root directory where you want to generate the code, and then click the Options tab:


  6. Select a UnitTest framework in "Unit test framework". You can choose between Nunit or Visual Studio Team Test.
  7. Click on OK to generate code immediately or Apply, and then Cancel to save your changes for later.