![]()
![]()
The Sybase RPC Mapping Transaction window is an interface for the SYRP transaction. To access the SYRP transaction through the Sybase RPC Mapping Transaction window, use the following procedure.
![]() Using SYRP
Using SYRP
From a CICS region, type SYRP.
![]() SYRP is the default transaction name
for RPC mapping to CICS transactions. This may not be the transaction
name at your site.
SYRP is the default transaction name
for RPC mapping to CICS transactions. This may not be the transaction
name at your site.
Press Enter.
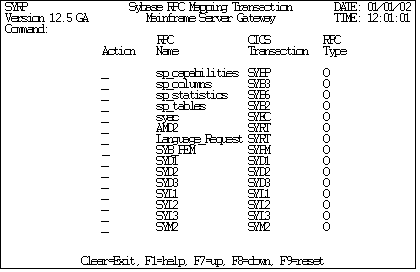
The Sybase RPC Mapping Transaction window appears:
Figure C-2: Sybase RPC Mapping Transaction window
The following section addresses:
This table explains the fields on the Sybase RPC Mapping Transaction window:
Field |
Description |
|---|---|
Command |
=X exits the SYRP transaction. =T goes to the top of the list. =B goes to the bottom of the list. RPC name searches for that RPC name. |
Action |
A adds an RPC name and CICS transaction to the mapping file. U updates an RPC name and CICS transaction in the mapping file. D deletes an RPC name and CICS transaction from the mapping file. |
RPC Name |
Name of the RPC. |
CICS Transaction |
Name of the CICS transaction. |
RPC Type |
O—Open Server RPC E—ECI RPC I—IMS RPC |
This table explains the PF keys on the Sybase RPC Mapping Transaction window:
PF Key |
Description |
|---|---|
Clear |
Exits the SYRP transaction. |
F1 |
Displays help for this window in the two lines above the list of PF keys at the bottom of the window. When you see three plus signs (+++) at the end of a line, press F1 to continue displaying help. When you see (END) at the end of a line, you have reached the end of the help. If you press F1 again, the beginning of the help appears and you can scroll through it again. |
F7 |
Scrolls up the list. |
F8 |
Scrolls down the list. |
F9 |
Resets the display to the current values in the SYRPCFIL file. |
| Copyright © 2005. Sybase Inc. All rights reserved. |
|
|
