One of the DataWindow object presentation styles, Group, is a shortcut to creating a grouped DataWindow object. It generates a tabular DataWindow object that has one group level and some other grouping properties defined. You can then further customize the DataWindow object.
![]() To create a basic grouped DataWindow object using the
Group presentation style:
To create a basic grouped DataWindow object using the
Group presentation style:
Select File>New>Other from the menu bar.
Select Sybase>DataWindow in the selection list. Then, click Next.
In the Create DataWindow Object page, enter values for the following fields and click Next.
Field |
Value |
|---|---|
DataWindow library |
Specify the library in which the DataWindow object is to be saved. |
DataWindow name |
Enter the name of the DataWindow object you want to create. |
Presentation style |
Choose Group as the presentation style for the DataWindow object. |
In the Database Connection Profile page, select an existing database connection profile or create a new one. To create a new database connection profile, see Step 4 in “To create a new DataWindow library:.”
In the Choose Data Source for Group DataWindow page, if you want data to be retrieved in the Preview view when the DataWindow object opens, select the Retrieve on Preview check box.
Choose a data source and define the data.
You are prompted to define the grouping column(s).
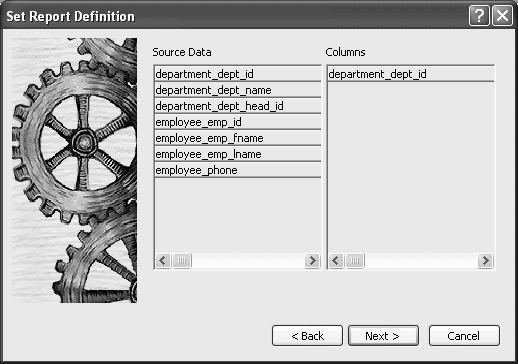
In the Set Report Definition page, drag the column(s) you want to group on from the Source Data box to the Columns box.
![]() Multiple columns and multiple group levels
You can specify more than one column, but all columns apply
to group level one. You can define one group level at this point.
Later you can define additional group levels.
Multiple columns and multiple group levels
You can specify more than one column, but all columns apply
to group level one. You can define one group level at this point.
Later you can define additional group levels.
In the following example, grouping will be by department, as specified by the dept_id column:
If you want to use an expression, you can define it when you have completed the wizard. See “Using an expression for a group”.
Click Next.
Sybase WorkSpace suggests a header based on your data source. For example, if your data comes from the Employee table, Sybase WorkSpace uses the name Employee in the suggested header.
In the Set Group Page Data page, specify the Page Header text.
If you want a page break each time a grouping value changes, select the New Page On Group Break box.
If you want page numbering to restart at 1 each time a grouping value changes, select the Reset Page Number On Group Break box and the New Page On Group Break box.
Click Next.
In the Select Color and Border Settings page, select Color and Border settings and click Next.
In the Ready to Create Group DataWindow page, review your specification and click Finish.
The DataWindow object displays with the basic grouping properties set.
This is an example of a Group style DataWindow object:
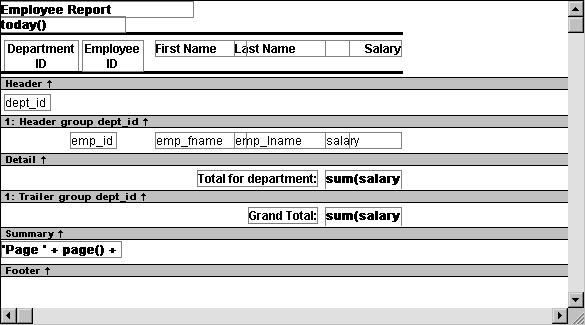
As a result of your specifications, Sybase WorkSpace generates a tabular DataWindow object and:
Creates group header and trailer bands
Places the column you chose as the grouping column in the group header band
Sorts the rows by the grouping column
Places the page header and the date (as a computed field) in the header band
Places the page number and page count (as computed fields) in the footer band
Creates sum-computed fields for all numeric columns (the fields are placed in the group trailer and summary bands)
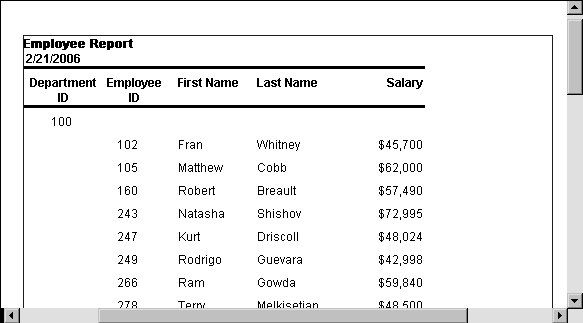
Here is the preceding DataWindow object in the Preview view:
If you want to use an expression for one or more column names in a group, you can enter an expression as the Group Definition on the General page in the Properties view after you have finished using the Group wizard.
![]() To use an expression for a group:
To use an expression for a group:
Open the Properties view and select the group header band in the Design view.
Double-click the ellipsis button next to the Group Definition box on the General page in the Properties view to open the Specify Group Columns dialog box.
In the Columns box, double-click the column that you want to use in an expression.
The Modify Expression dialog box opens. You can specify more than one grouping item expression for a group. A break occurs whenever the value concatenated from each column/expression changes.
You can use any of the techniques available in a tabular DataWindow object to modify and enhance the grouped DataWindow object, such as moving controls, specifying display formats, and so on. In particular, see “Defining groups in an existing DataWindow object” to learn more about the bands in a grouped DataWindow object and how to add features especially suited for grouped DataWindow objects (for example, add a second group level, define additional summary statistics, and so on).
![]() DataWindow Object is not updatable by default
When you generate a DataWindow object using the Group presentation
style, Sybase WorkSpace makes it not updatable by default. If you want
to be able to update the database through the grouped DataWindow object,
you must modify its update characteristics.
DataWindow Object is not updatable by default
When you generate a DataWindow object using the Group presentation
style, Sybase WorkSpace makes it not updatable by default. If you want
to be able to update the database through the grouped DataWindow object,
you must modify its update characteristics.
| Copyright © 2007. Sybase Inc. All rights reserved. |
|
|