![]()
![]()
![]()
![]()
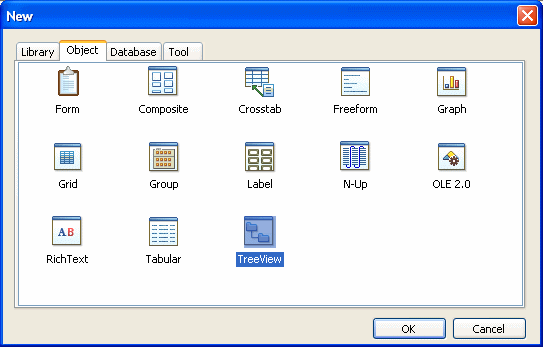
Select File>New from the menu bar and select the Object tab.
Choose the TreeView presentation style for the report and click OK.
Select the data source you want to use.
You are prompted to specify the data.
Define the tables and columns you want to use.
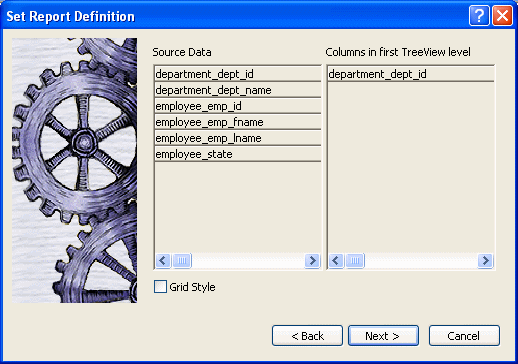
You are prompted to specify the TreeView grouping columns.
![]() Multiple columns and multiple TreeView levels
You can specify more than one column, but all columns apply
to TreeView level one. At this point, you can define only one TreeView
level. You define additional levels later.
Multiple columns and multiple TreeView levels
You can specify more than one column, but all columns apply
to TreeView level one. At this point, you can define only one TreeView
level. You define additional levels later.
In the following example, TreeView grouping will be by department, as specified by the dept_id column:
If you want to use an expression, you can define it when you have completed the wizard. See “Using an expression for a column name”.
The sample report shown in “Example” uses the department and employee tables in the EAS Demo DB database.
Specify the column or columns that will be at the top level (level 1) of the TreeView report.
The sample report uses the department name as the top level. If you want to display both the department ID and department name, you specify that both columns are at the top level.
If you want the TreeView report to display grid lines, select the Grid Style check box.
When you select the Grid Style check box, the TreeView report displays grid lines for rows and columns. You can drag the grid lines to resize rows and columns.
Click Next.
Modify the default color and border settings if needed, and then click Next.
Review the TreeView report characteristics.
Click Finish.
The report painter Design view displays. For information about the Design view, see “TreeView report Design view”. For information about adding additional levels, see “Adding and deleting TreeView levels”.
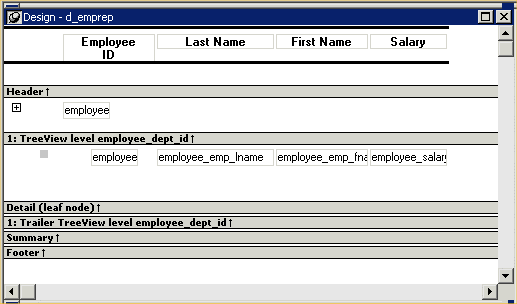
As a result of your specifications, InfoMaker generates a TreeView report and creates:
A TreeView header band with controls that include the heading text of the detail band columns
The first TreeView level band with the TreeView level columns you chose in the wizard
The detail (leaf node) band that includes all the column controls except for first-level columns you selected in the wizard
A level 1 trailer band.
A summary band, and a footer band.
Here is the sample TreeView report in the Design view:
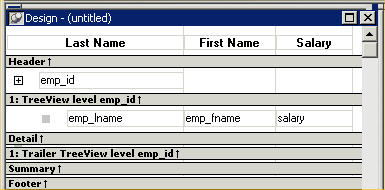
If you selected the Grid Style check box, vertical and horizontal grid lines display:
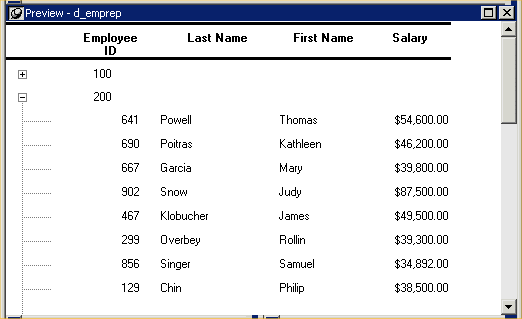
Here is the sample TreeView report in the Preview view:
If you want to use an expression for one or more column names in a TreeView, you can enter it as the TreeView definition on the General page in the Properties view after you finish using the TreeView wizard.
![]() To use an expression for a TreeView column name:
To use an expression for a TreeView column name:
Open the Properties view and click the TreeView level band in the Design view.
Click the ellipsis button next to the TreeView Level Definition box on the General page in the Properties view to open the Specify Group Columns dialog box.
In the Columns box, double-click the column you want to use in an expression.
The Modify Expression dialog box opens. You can specify more than one grouping item expression for a group. A break occurs whenever the value concatenated from each column/expression changes.
All of the techniques available in a tabular report, such as moving controls and specifying display formats, are available for modifying and enhancing TreeView reports. See “Adding and deleting TreeView levels” to read more about the bands in a TreeView report and see how to add features especially suited for TreeView reports, such as additional TreeView levels or summary statistics.
![]() Report is not updatable by default
When you generate a report using the TreeView presentation
style, InfoMaker makes it not updatable by default. If you want
to be able to update the database through the TreeView report,
you must modify its update characteristics. For more information,
see Chapter 19, “Controlling Updates in Forms.”
Report is not updatable by default
When you generate a report using the TreeView presentation
style, InfoMaker makes it not updatable by default. If you want
to be able to update the database through the TreeView report,
you must modify its update characteristics. For more information,
see Chapter 19, “Controlling Updates in Forms.”
