![]()
Now you run the application again to test the insert, update, and delete capabilities of the second DataWindow.
Click the Run button in the PowerBar.

PowerBuilder prompts you to save your changes.
Click Yes.
The application begins running, and the login window displays.
Type dba in
the User ID box.
Type sql in the
Password box and click OK.
The database connection is established, and the MDI frame for the application displays.
Select File>Report>Maintain Customers from the menu bar.
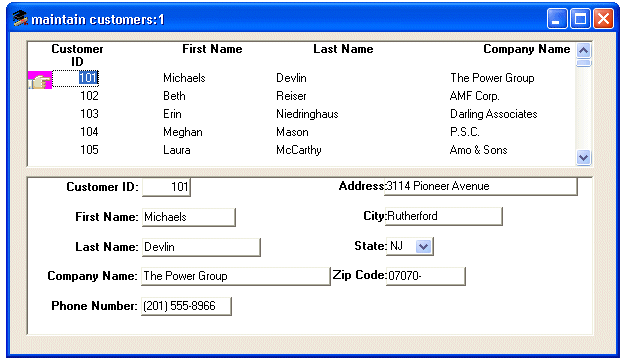
The Customer window displays.

The top DataWindow control (dw_master) shows all of the rows retrieved from the Customer table. The hand pointer shows which row is selected.
The bottom DataWindow control (dw_detail) shows further information about the selected customer.
In the running application, click the Insert button in the toolbar
or
Select Edit>Insert from the Frame window menu bar.
This clears (resets) the dw_detail DataWindow, allowing you to add information for a new row that you will insert into the data source. The cursor is in the Customer ID box in the dw_detail control.
Add a new customer row by entering information in the boxes in the detail DataWindow.
![]() Typing information for a new customer
The Customer ID number must be unique. To avoid duplicate
numbers, use a four-digit number for your new database entry, or
scroll down the list of three-digit customer numbers in the master
DataWindow and select an ID number that does not appear in the list.
Typing information for a new customer
The Customer ID number must be unique. To avoid duplicate
numbers, use a four-digit number for your new database entry, or
scroll down the list of three-digit customer numbers in the master
DataWindow and select an ID number that does not appear in the list.
Enter values for the remaining fields.
The phone number and zip code use edit masks to display the information you type. You must enter numbers only for these data fields. To specify the state in which the customer resides, you must click the arrow next to the state column and select an entry from the drop-down list box.
Click the Update button in the toolbar
or
Select Edit>Update from the menu bar.
This sends the new customer data to the database and displays a confirmation message, as coded in the script for the ue_update event.
The new customer does not yet display in the master DataWindow. (You could add code to include this feature). However, if you open another instance of the w_customers sheet, the new customer data is visible in both the master and detail DataWindow controls.
Click OK in the message box.
Click a customer in the master DataWindow.
That customer data displays in the lower DataWindow.
Change the customer address in the detail DataWindow.
Click the Update button in the toolbar
or
Select Edit>Update from the menu bar.
This sends the revised customer data to the database and displays another confirmation message.
Click OK in the message box.
Select another customer in the master DataWindow.
That customer data displays in the detail DataWindow.
Click the Delete button in the toolbar
or
Select Edit>Delete from the menu bar.
The customer is deleted from the DataWindow immediately but is not deleted from the database unless you select the Update option on the Edit menu. In this particular situation, the Update operation may fail, because rows in other tables in the EAS Demo DB database may refer to the row that you are trying to delete.
You should be able to delete any row that you have added to the database.
Select File>Exit from the menu bar.
The application terminates and you return to the Window painter.
Close the Window painter.