![]()
Run the tutorial in PowerBuilder
> Make changes for a .NET Web Forms application
Create a .NET Web Forms target and project
Deploy a .NET Web Forms project
Run the application from a Web browser
Unless you plan always to start the tutorial database manually before your Web Forms application connects to the database, you must grant ASP.NET users full control of the directories containing the database and the SQL Anywhere database engine, and extend that permission to all the files in those directories.
![]() If you followed the procedure in the Granting
ASP.NET user permissions section of the Deploying
Applications and Components to .NET book to set permissions
on one or both of the directories, you do not need to set them again here.
If you followed the procedure in the Granting
ASP.NET user permissions section of the Deploying
Applications and Components to .NET book to set permissions
on one or both of the directories, you do not need to set them again here.
In Windows Explorer, browse to the PowerBuilder Tutorial directory (described in “The Tutorial directory”).
This directory contains the tutorial database.
![]() If you already set permissions on this directory by
following the procedure in the Granting ASP.NET user permissions section
of the Deploying Applications and Components to .NET book,
you will not need to repeat the procedure at Step 10.
If you already set permissions on this directory by
following the procedure in the Granting ASP.NET user permissions section
of the Deploying Applications and Components to .NET book,
you will not need to repeat the procedure at Step 10.
Right-click the directory and select Properties from the pop-up menu.
Select the Security tab of the Properties dialog box for the directory and click the Add button.
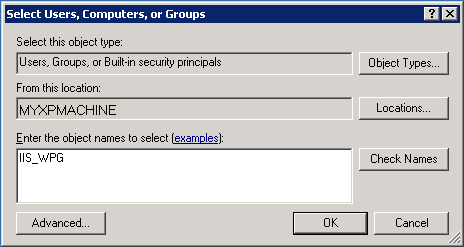
The Select Users, Computers, or Groups dialog box displays.
![]() If the Security tab does not display
To display the Security tab, you might need to modify a setting
on the View tab of the Folder Options dialog box for your current
directory. You open the Folder Options dialog box by selecting the
Tools>Folder Options menu item from Windows Explorer. To display
the Security tab, you must clear the check box labeled “Use
simple file sharing (Recommended)”.
If the Security tab does not display
To display the Security tab, you might need to modify a setting
on the View tab of the Folder Options dialog box for your current
directory. You open the Folder Options dialog box by selecting the
Tools>Folder Options menu item from Windows Explorer. To display
the Security tab, you must clear the check box labeled “Use
simple file sharing (Recommended)”.
Click Locations, choose the server computer name from the Locations dialog box, and click OK.
Type ASPNET, IIS_WPG,
or IIS_USRS in the
list box labeled “Enter the object names to select” and
click OK.
![]() Before you click OK
If you click the Check Names button, a message displays if
the system does not recognize the user name you entered. If the
name is not recognized, you might have to reinstall the Microsoft
NET Framework.
Before you click OK
If you click the Check Names button, a message displays if
the system does not recognize the user name you entered. If the
name is not recognized, you might have to reinstall the Microsoft
NET Framework.
Enter ASPNET for IIS 5, IIS_WPG for IIS 6, or IIS_USRS for IIS 7. The ASP.NET account you enter is added to the Security settings tab for the current directory.

Select the new user account in the top list box on the Security tab, then select the “Full Control” check box under the Allow column in the bottom list box.
Click the Advanced button.
The Advanced Security Settings dialog box displays for the current directory.
Select the check box labeled “Replace permission entries on all child objects with entries shown here that apply to child objects” and click OK.
A Security dialog box displays to warn you it will remove current permissions on child objects and propagate inheritable permissions to those objects, and prompts you to respond.
Click Yes at the Security dialog box prompt, then click OK to close the Properties dialog box for the current directory.
Repeat steps 1-9 for the SQL Anywhere 11\Bin32 directory, if you have not already done so.