![]()
![]()
![]()
![]()
![]()
Run the tutorial in PowerBuilder
Make changes for a .NET Web Forms application
Create a .NET Web Forms target and project
Deploy a .NET Web Forms project
> Run the application from a Web browser
You are now ready to run the tutorial as a Web Forms application. In this lesson, you start one application session from PowerBuilder and another session by typing the application URL in a Web browser Address box.
Start the EAS Demo DB V120 database manually if necessary.
You do not need to start the database manually if you set full control permissions for the ASP.NET user for the database and database engine directories, as described in “Grant ASP.NET users full control over key directories and files” on page 112.
Right-click the p_pbtutor_webform project in the PowerBuilder System Tree and select Run from the pop-up menu.
If you left the p_pbtutor_webform project open in the Project painter, you can select Design>Run from the Project painter menu or you can click the Run Project icon in the PainterBar instead of using the System Tree pop-up menu. You cannot run the project from the System Tree pop-up menu while a PowerBuilder painter is open for any of the project objects.
The welcome window (login screen) for the tutorial application displays in the Web browser. When you run the application from the PowerBuilder design-time environment, you do not see the browser menus and toolbars.
Open a second Internet Explorer (IE) browser from the Windows Start menu or task bar.
You can open a browser on a different computer if you have one available. Next, you start a second session for the tutorial application.
Type http://serverName/pbtutor/default.aspx in the IE Address box, where serverName is the name of the IIS server where you deployed the tutorial application.
If you open a Web browser on the IIS server machine, and you deployed the application to “localhost”, you can use localhost for the server name in the browser’s Address box. When you start the application from a Web browser and include the default.aspx start page, the browser menus and toolbars remain visible when the Web Forms application displays in the browser window.
Enter dba for the user ID, sql for the password, and click OK.
After a successful login, the tutorial application’s Frame window displays in the Web browser.
Select File>Report>Maintain Customers from the Frame window menu.
The Maintain Customers sheet window displays. The master DataWindow on this page uses the Numeric style page navigation control. You can click on a number to navigate to a different page. Because you did not change the PBDataWindowRowsPerPage property in the IIS manager, the number of DataWindow rows per page is 20.
Frame window and the sheet window toolbars display separately.

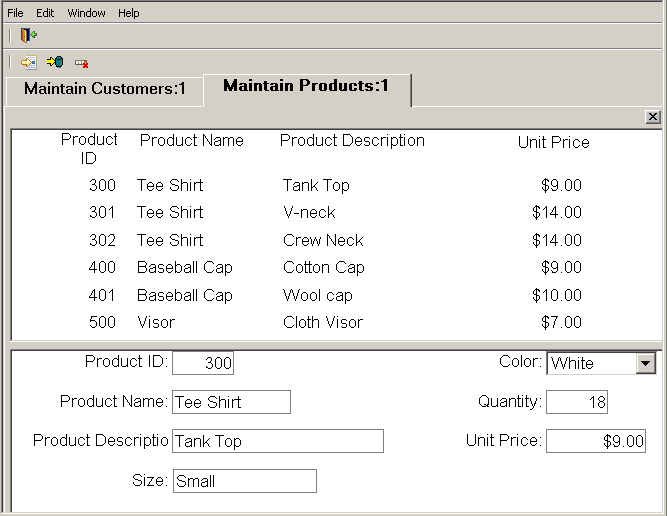
Select File>Report>Maintain Products from the Frame window menu.
The Maintain Products sheet window displays. Sheet windows display in a tab page format rather than as detached, cascading windows.
You do not see any page navigation controls on the Maintain Products page because its DataWindow controls do not have more than 20 rows (the value set by the global PBDataWindowRowsPerPage property) and are therefore completely visible in a single page.
The following picture displays the tab page format used in the classic Web style presentation.
Continue testing the tutorial or select File>Exit from the application Frame window menu.
You should be able to insert, update, and delete database entries from the tutorial Web Forms application, just as you were able to do from the PowerBuilder native tutorial application.
After you finish with the current Web Forms session, you might want to experiment with changing other global properties in addition to PBDataWindowPageNavigatorType. For example, to examine the File Manager and the Mail Profile Manager, you can set the PBFileManager and PBMailManager global properties to true.
For more information about Web Forms targets, including the File Manager and Mail Profile Manager, see the Deploying to Applications and Components to .NET book.
