Creating the Android Project

Create a new Android project in the Android Plugin for Eclipse, where you add functionality and finish developing the application.

Prerequisites
In the Unwired WorkSpace, you need to set the SDK locations.
Task
  1. Start Unwired WorkSpace.
  2. Select File > New > Project.
  3. Select Android > Android Project and Next.
    Depending on the Android version you are using, the information you provide in the next several steps may be in one or two screens.
  4. In the Create Android Project wizard, use these values and click Next.
    • Project Name - enter SUP101Sample.
    • Verify Create new project in workspace is selected.
    • Verify Use default location is selected, for example, C:/Documents and Settings/user/workspace/SUP101Sample.

    Android Tutorial Create Android Project Image
  5. In the Select Build Target window, click an Android version 2.2 or higher and Next.
  6. In the Application Info window, use these values and click Finish.
    • Application Name - verify SUP101Sample is entered.
    • Package Name - enter com.sybase.sup.samples.objectapi.
    • Verify Create Activity checkbox is selected and SUP101SampleActivity is entered.
    In the left-hand pane, you should see the Package Explorer with the SUP101Sample project listed.

    A Default Activity class is automatically generated.

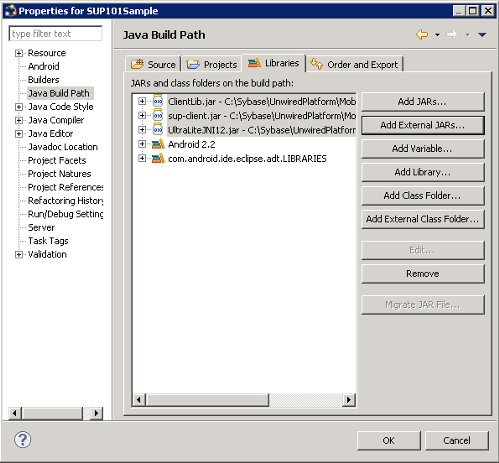
  7. In the Package Explorer, modify the build path to point to the correct location for the ClientLib.jar, sup-client.jar, and UltraLiteJNI12.jar files for the project:
    1. Select the SUP101Sample project.
    2. Select Project> Properties > Java Build Path.
    3. Select the Libraries tab.
    4. Click Add External JARS and browse to C:\Sybase\UnwiredPlatform\MobileSDK\ObjectAPI\Android.
    5. Select all the JAR files, then click Open.
    6. Click OK.

    Android Tutorial Add Java Build Path Image
  8. In the Package Explorer, modify the Java Compiler compliance level:
    1. Select the SUP101Sample project.
    2. Select Project > Properties > Java Compiler.
    3. Select the Enable project specific settings checkbox.
    4. From the Compiler compliance level list, select 1.6.
    5. Click OK.
  9. Add a compiler resource to the root directory of your Android project:
    1. In Windows Explorer, browse to the C:\Sybase\UnwiredPlatform\MobileSDK\ObjectAPI\Android directory.
    2. Copy the armeabi folder.
    3. In Package Explorer, select SUP101Sample and add a libs folder.
    4. In the libs folder, paste the armeabi folder.
  10. In the Package Explorer, add user permissions to the project:
    1. Expand the SUP101Sample project.
    2. Double-click the AndroidManifest.xml file.
    3. Select the AndroidManifest.xml tab.
    4. Add permissions to the AndroidManifest.xml file as a child element of <manifest>.
      
      <uses-permission android:name="android.permission.INTERNET">
        </uses-permission>
      <uses-permission android:name="android.permission.READ_PHONE_STATE">
        </uses-permission>
    5. Select File > Save.