![]()
![]()
![]()
![]()
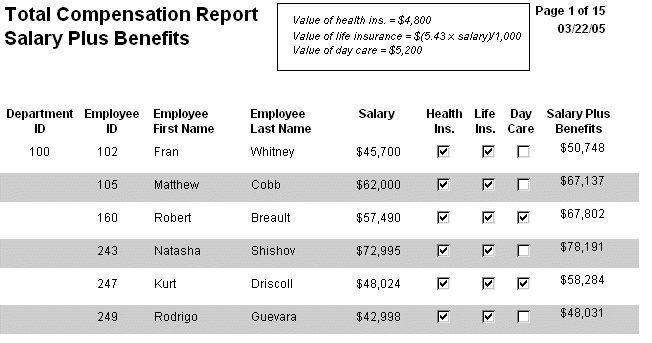
The following DataWindow object shows alternate rows with a light gray bar. The gray bars make it easier to track data values across the row:
To create the gray bar effect:
Add a rectangle control to the detail band and size it so that it surrounds the controls you want highlighted.
To make sure that you have selected the detail band, select the Position tab in the Properties view and select Band from the Layer drop-down list.
To make it easier to see what you are doing in the Design view, select the General tab and set the Brush Color to White and the Pen Color to Black. A narrow black line forms a boundary around the rectangle.
Select Send to Back from the rectangle’s pop-up menu.
To hide the border of the rectangle, set the Pen Style to No Visible Line.
Click the button next to the Brush Color property on the General page.
In the Modify Expression dialog box, enter the following expression for the Brush.Color property:
If(mod(getrow(),2 )=1, rgb(255, 255, 255 ), rgb(240, 240, 240 ))
The mod function takes the row number (getrow()),
divides it by 2, then returns
the remainder. The remainder can be either 0 or 1. If the row number
is odd, mod returns 1; if the row number is even, mod returns
0.
The expression mod(getrow(),2)=1 distinguishes
odd rows from even rows.
The rgb function specifies maximum amounts
of red, green, and blue: rgb (255, 255, 255).
Specifying 255 for red, green, and blue results in the color white.
If the row number is odd (the condition evaluates as true),
the rectangle displays as white. If the row number is even (the
condition evaluates as false), the rectangle displays as light gray
(rgb (240, 240, 240)).
