Lesson 1. Create a table viewer

This tutorial is based on Visual Studio and the .NET Framework. The complete application can be found in the ADO.NET project samples-dir\SQLAnywhere\ADO.NET\SimpleViewer\SimpleViewer.sln.

In this tutorial, you use Microsoft Visual Studio, the Server Explorer, and the SQL Anywhere .NET Data Provider to create an application that accesses one of the tables in the SQL Anywhere sample database, allowing you to examine rows and perform updates.

To develop a database application with Visual Studio

  1. Start Visual Studio.

  2. From the Visual Studio File menu, choose New » Project.

    The New Project window appears.

    1. In the left pane of the New Project window, choose either Visual Basic or Visual C# for the programming language.
    2. From the Windows subcategory, choose Windows Application (VS 2005) or Windows Forms Application (VS 2008).
    3. In the project Name field, type MySimpleViewer.
    4. Click OK to create the new project.
  3. In the Visual Studio View menu, choose Server Explorer.

    The Server Explorer window appears.

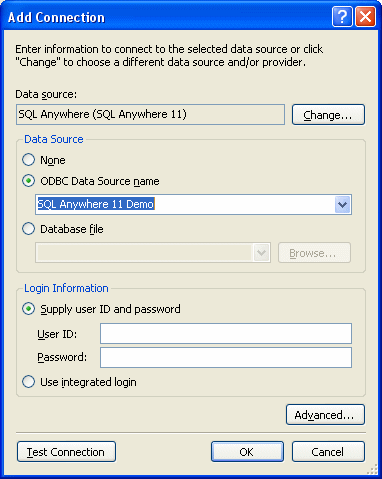
  4. In the Server Explorer window, right-click Data Connections and choose Add Connection.

    The Add Connection window appears.

    1. If you have never used Add Connection for other projects, then you will see a list of data sources. Select SQL Anywhere from the list of data sources presented.

      If you have used Add Connection before, then click Change to change the data source to SQL Anywhere.

    2. Under Data Source, select ODBC Data Source Name and type SQL Anywhere 11 Demo.
      The Add Connection window with ODBC Data Source name selected.
    3. Click Test Connection to verify that you can connect to the sample database.
    4. Click OK.

    A new connection named SQL Anywhere.demo11 appears in the Server Explorer window.

  5. Expand the SQL Anywhere.demo11 connection in the Server Explorer window until you see the table names.

    1. Right-click the Products table and choose Show Table Data.

      This shows the rows and columns of the Products table in a window.

    2. Close the table data window.
  6. From the Visual Studio Data menu, choose Add New Data Source.

    The Data Source Configuration Wizard appears.

    1. On the Data Source Type page, select Database and click Next.
    2. On the Data Connection page, select SQL Anywhere.demo11 and click Next.
    3. On the Save The Connection String page, make sure that Yes, Save The Connection As is selected and click Next.
    4. On the Choose Your Database Objects page, select Tables and click Finish.
  7. From the Visual Studio Data menu, choose Show Data Sources.

    The Data Sources window appears.

    Expand the Products table in the Data Sources window.

    1. Click Products and choose Details from the dropdown list.
    2. Click Photo and choose Picture Box from the dropdown list.
    3. Click Products and drag it to your form (Form1).
    Form1 displays a control and several labeled text fields.

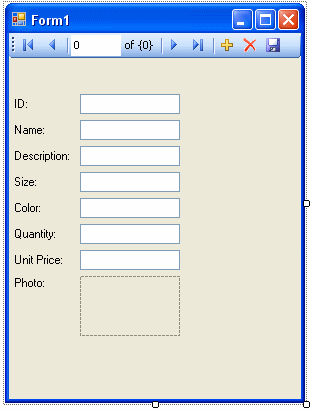
    A dataset control and several labeled text fields appear on the form.

  8. On the form, select the picture box next to Photo.

    1. Change the shape of the box to a square.
    2. Click the right-arrow in the upper-right corner of the picture box.

      The Picture Box Tasks window opens.

    3. From the Size Mode dropdown list, choose Zoom.
    4. To close the Picture Box Tasks window, click anywhere outside the window.
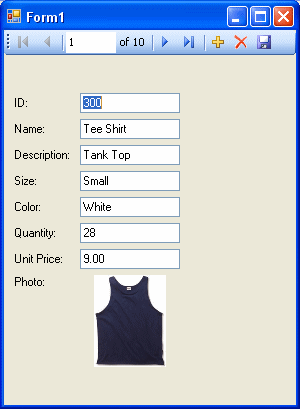
  9. Build and run the project.

    1. From the Visual Studio Build menu, choose Build Solution.
    2. From the Visual Studio Debug menu, choose Start Debugging.

      The application connects to the SQL Anywhere sample database and displays the first row of the Products table in the text boxes and picture box.

      The application, with a row in the Products table displayed.
    3. You can use the buttons on the control to scroll through the rows of the result set.
    4. You can go directly to a row in the result set by entering the row number in the scroll control.
    5. You can update values in the result set using the text boxes and save them by clicking the diskette icon.

    You have now created a simple, yet powerful, .NET application using Visual Studio, the Server Explorer, and the SQL Anywhere .NET Data Provider.

  10. Shut down the application and then save your project.