![]()
![]()
![]()
![]()
Now you add code so that the connection to the database is made and data is retrieved into the master DataWindow when the form is loaded. You need to establish the relationship between the WebDataWindowControl and the Transaction object at the same time. If any errors occur, they display in a text box.
![]() To connect to the database and set up the transaction:
To connect to the database and set up the transaction:
Select View>Designer to open the default.aspx form.
Expand the Standard tab in the Visual Studio .NET Toolbox, drag a TextBox control onto the form below the dwCustomer DataWindow.
In the properties window, set its ID to errMsg, its TextMode to Multiline, and its Visible property to false.
The text box will only display if an error occurs.
Double-click in an empty area of the form.
This creates an event handler for the page’s Load event and opens the code editor:
[Visual Basic]
Private Sub Page_Load(ByVal sender As System.Object, ByVal e As System.EventArgs) Handles MyBase.Load

End Sub
[C#]
private void Page_Load(object sender, System.EventArgs e)
{
}
Type the following in the Page_Load event handler:
[Visual Basic]
If Not Me.IsPostBack Then
   Try
      InitializeComponent()
      myTrans.Connect()
      dwCustList.SetTransaction(myTrans)
      dwCustList.Retrieve()
   Catch Ex As Exception
      errMsg.Text = ex.ToString()
      errMsg.Visible = true
      dwCustomer.Visible = false
   End Try
End If
[C#]
if (!this.IsPostBack)
{
   try
   {
      InitializeComponent();
      myTrans.Connect();
      dwCustList.SetTransaction(myTrans);
      dwCustList.Retrieve();
   }
   catch(System.Exception ex)
   {
      errMsg.Text = ex.ToString();
      errMsg.Visible = true;
      dwCustomer.Visible = false;
   }
}
This code connects to the database, associates the connected Transaction object with the master DataWindow, and retrieves data into the master DataWindow. If any exception is thrown, the errMsg textbox displays with the text of the exception.
When you drag a Transaction object to a form, it is added to the form’s components list, and is automatically disconnected and disposed of when the form is closed. If you do not use drag-and-drop, you need to disconnect from the database when the form is unloaded.
![]() To disconnect from the database in Visual Basic:
To disconnect from the database in Visual Basic:
In the code editor, select Unload from the list of events in the drop-down list at the top right.
The Page_Unload event handler displays.
Type myTrans.Disconnect()to
disconnect from the database when the page is unloaded:
Private Sub Page_Unload(ByVal sender As Object, ByVal e As System.EventArgs) Handles MyBase.Unload
   myTrans.Disconnect()
End Sub
![]() To disconnect from the database in C#:
To disconnect from the database in C#:
Select View>Component Designer from the menu.
In the Properties window, select _Default from the drop-down list at the top of the window to display properties for the Web page.
Click the Events button to display a list of events
for the control, type Page_Unload in
the event name box for the Unload event, and press the Tab key:
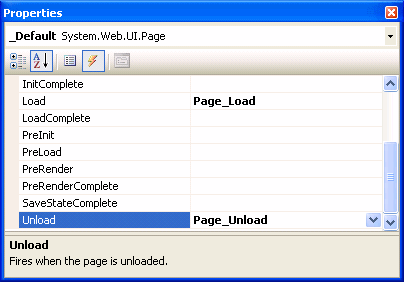
This associates the Page_Unload event handler with the form’s Unload event. The code editor opens with the cursor in the body of the event handler.
To disconnect from the database when the page
is unloaded, type myTrans.Disconnect(); in
the event handler:
private void Page_Unload(object sender, System.EventArgs e)
{
   myTrans.Disconnect();
}
You can run the application at this point to check that the master DataWindow displays. Make sure the EAS Demo database is running before you start the application. The first time you run the application using Run>Start Debugging, Visual Studio displays a Debugging Not Enabled message box. Select OK to enable debugging.
