Changing the DBMS

You can change the DBMS being modeled in your PDM at any time.

If you change the DBMS being modeled, the model will be altered to conform with the new DBMS as follows:
  • All data types specified in your model will be converted to their equivalents in the new DBMS.

  • Any objects not supported by the new DBMS will be deleted

  • Certain objects, whose behavior is heavily DBMS-dependent may lose their values.

Note: You may be required to change the DBMS if you open a model and the associated definition file is unavailable.
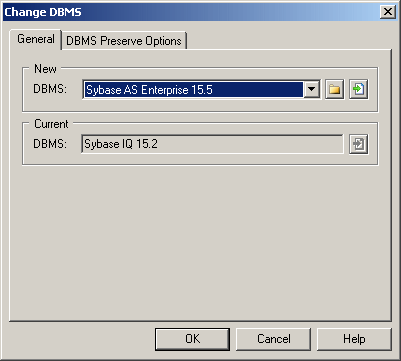
  1. Select Database > Change Current DBMS:

    Change PDM Target
  2. Select a DBMS from the list.

    By default, PowerDesigner creates a link in the model to the specified file. To copy the contents of the resource and save it in your model file, click the Embed Resource in Model button to the right of this field. Embedding a file in this way enables you to make changes specific to your model without affecting any other models that reference the shared resource.

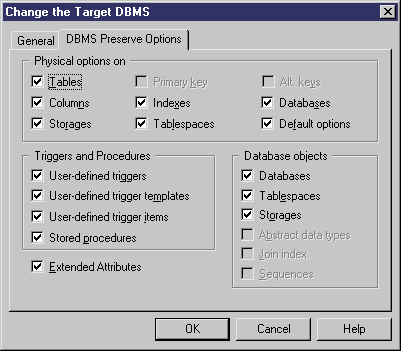
  3. [optional] Click the DBMS Preserve Options tab, and select the check boxes for the objects and options that you want to preserve:
    • Triggers and stored procedures – triggers are always rebuilt when you change DBMS.

    • Physical options - if the syntax of an option is incompatible with the new DBMS, the values will be lost, even if you have selected to preserve the physical option. For example, the physical option in used by ASA is not supported by Oracle and any values associated with that option will be lost.

    • DBMS-specific objects - databases, storages, tablespaces, abstract data types, sequences.

    • Extended attributes - which are defined for a particular DBMS.


    Note:

    If you are changing DBMS within a database family, for example between Sybase ASE 12.5 and 15, all preserve options available are selected by default. The database objects not supported by the old and new DBMSs are disabled.

  4. Click OK.

    A message box opens to tell you that the DBMS has been changed.

  5. Click OK to return to the model.