![]()
![]()
![]()
![]()
When you define a report, you can specify that it print in multiple columns across the page, like a newspaper. A typical use of newspaper-style columns is a phone list, where you want to have more than one column of names on a printed page.
![]() Use Print Preview to see the printed output
Newspaper-style columns are used only when the report is
printed. They do not appear when a report runs (or in Preview).
Therefore, to see them in InfoMaker, use Print Preview in the Report painter.
Use Print Preview to see the printed output
Newspaper-style columns are used only when the report is
printed. They do not appear when a report runs (or in Preview).
Therefore, to see them in InfoMaker, use Print Preview in the Report painter.
![]() To define newspaper-style columns for a report:
To define newspaper-style columns for a report:
Build a tabular report with the data you want.
Select Properties from the report’s pop-up menu.
Select the Print Specifications tab.
Specify the number of columns across the page and the width of columns in the Newspaper Columns Across and Newspaper Columns Width properties.
For each control in the report that you do not want to have appear multiple times on the page (such as headers), select Properties from the control’s pop-up menu and select the HideSnaked check box on the General page in the Properties view.
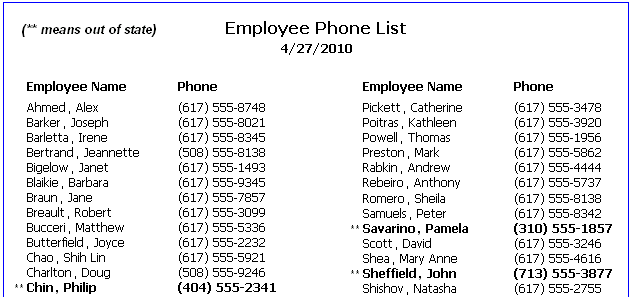
This example describes how to create a newspaper-style report using the Employee table in the EAS Demo DB.
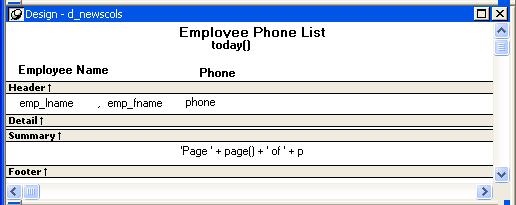
Create a tabular report, selecting the last name, first name, and phone number columns, and add a title, page number, and date.
The Emp_Fname column and the text control holding a comma are defined as Slide Left, so they display just to the right of the Emp_Lname column.
On the Print Specifications page of the report’s Properties view, specify two columns across and a column width of 3.5 inches in the Newspaper Columns boxes. (Make sure that Units is set to inches on the General property page.)
To view the report as it will be printed, place the pointer in the Preview view and select File>Print Preview.
The report displays the result set in two columns. Everything above the column headers (which includes page number, title, and date) also shows twice because of the 2-column specification. This information should appear only once per page.
To specify that page number, title, and date appear only once on the page, you need to suppress printing after the first column. For each of these controls, select Properties from the control’s pop-up menu. Then set the HideSnaked property.
The finished report has one set of page heading information and two columns of column header and detail information.