- Determine the import source and verify access to that source.
- Verify the import source was created with the same or earlier version of the Agentry Mobile Platform. Export files or Server published applications created with a later version cannot be imported into an earlier version.
- Verify the correct Agentry application project to which definitions will be imported is the one currently open in the Agentry Perspective within Eclipse.
- Back up the current project by exporting the entire project, or by committing any changes to the Agentry share repository prior to beginning the import.
This procedure describes the steps involved in importing definitions from an import source into the current Agentry application project. This process includes comparing the two projects and selecting those components to import to the current project. When completed, any definitions selected in the import source will be added to the current application project. The source application will be unaffected by the procedure. This process may be cancelled at any time.
- Compare and import from the currently connected share repository. This is a feature included in the Team Development support added to the system with the release of Agentry version 5.2. This includes manual compare operations where the share repository is selected, as well as updates from the share that result in conflicts.
- Make use of archived customizations or components in the current application project.
- Merge development work performed by multiple developers into a single master project. Note that this is not a part of the Team Development support and feature set. It is recommended that the Team Development features be used when coordinating work among multiple developers for the same application. Importing from an export file of another developer’s work can still be performed, but should be limited to the scenarios of handing off responsibility for development, or when making use of modifications made to one project that are needed in another application project.
- Right click the root folder for the application project
in the Project Explorer View and select the menu item Compare
With | Compare with other Agentry project.
This will open the Comparison View in the Agentry Perspective, with no project items yet displayed. It will remain blank until the import source is selected for comparison:
- Within this view, above the pane on the right side, is
the button [Select Session]. This button allows for the
selection of the import source. Its behavior and the proper selection
to make depend on whether or not the open project is currently connected
to a share repository:
- If connected to a share repository, clicking the button will automatically open the share revision matching the last revision to which the project was updated. The share is then set as the import source, and other revisions can be selected within the share to compare and import from within the share.
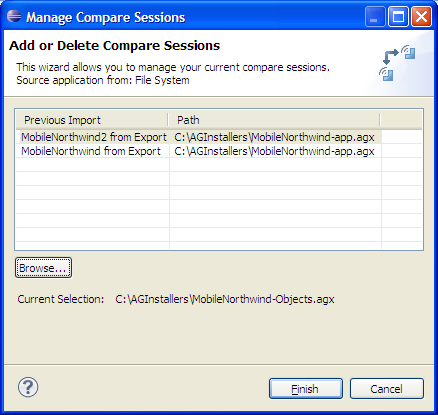
- If not connected to a share, clicking this button opens
the Manage Share Sessions screen. Within this screen either a previous
import session can be reopened, or a new import source can be selected
by clicking the [Browse] button below the list of save sessions:
- Alternately, whether connected to a share or not, clicking the drop down arrow for this button lists the import sources appropriate to the current project’s connection status. Always listed are any previous import sessions, as well as a menu item to display the Manage Compare Sessions screen. If connected to a share, an additional menu item is displayed that opens a sub-menu listing all revisions of the share to which the project is connected.
Once the import source is selected, that source and the current project are opened in the Comparison View and displayed side-by-side:


Once this procedure is complete, the selected definitions in the import source are now a part of the open application in the Agentry Perspective. They may be modified further within the open project or otherwise used as needed. If the session was cancelled at any point, any applied imports will remain. Any imports that were not applied will be rolled back.
Whenever importing into an existing application project, it is always recommended that a check is performed of the resulting project to verify the new definitions are defined as needed. Any modifications can be made according to normal processes. All imports, as with any other application change, should be thoroughly tested before being published to a live production environment.