Prerequisites
NSIS (Nullsoft Scriptable Install System) is
a professional open source system that is used to create Windows
installers. This is the software used to create the branded installers
for the Agentry
Clients.
In
order to brand the Client installers, you will need to have Microsoft’s Cabwiz.exe installed
on your system.
Task
The following main steps walk you through the basics
of creating branded installers for the Agentry
Client.
- Download and install Nullsoft NSIS.
- Open a browser and go to http://nsis.sourceforge.net.
You are brought to the Nullsoft Scriptable Install
System Main Page.
- Click the [Download] link under “Latest NSIS
release.”
An NSIS setup file is downloaded to your computer.
- Run the nsis-[version]-setup.exe.
Make sure to note the location where you install
the NSIS files because you will need this information later in the
branding process.
After you run the NSIS setup program, a full set
of NSIS files is installed on your computer. Typically, you will
put the NSIS folder inside your Program Files folder. Be sure to
note the location because you will need the full path information
when you build the branded installer.
- Create the branding source. The same Agentry installers
that are used to install the products are used to create the branding
installer sources for the Client.
- To create the branding Client installer
source, run ClientWinCE_Branding_sdk.exe.
Use the switch “/Branding=[folder name]” to
put the branding Client installer into a folder of your choice.
- When creating a Client installer source, you must
also build CAB files for each supported device and for each supported
scanner. To do this in a single step, run the command script cabs/BuildCabs.cmd.
Note: In order to run the Cabs script, you must have
Microsoft’s Cabwiz.exe.
These steps create all the files necessary to complete
the customization of the Client installer.
- Customize the installers. Once you have the branding
source files, you are ready to use those files to modify items such
as the company name, product name, and installer names. You must
customize the installers for the Client .nsi files,
as necessary.
- Optionally, make a copy of the AgentryClientWinCE.nsi file.
You can optionally make a copy of the files so that
you always have the original in case your modified file ever gets
overwritten. If you do not make a copy, and need the original files,
you can re-install them.
- Open the .nsi files in a text editor,
one at a time, and follow the instructions in the file to modify the
common items. These items include things like product name, company
name, installer name, company URL, and the uninstaller executable
name.
Your modified .nsi files should
now contain all custom branding details for your Client installer.
Note: If
you want to do more advanced branding, including things such as
your company logos, you need to go to the Nullsoft Web site for
complete programming instructions.
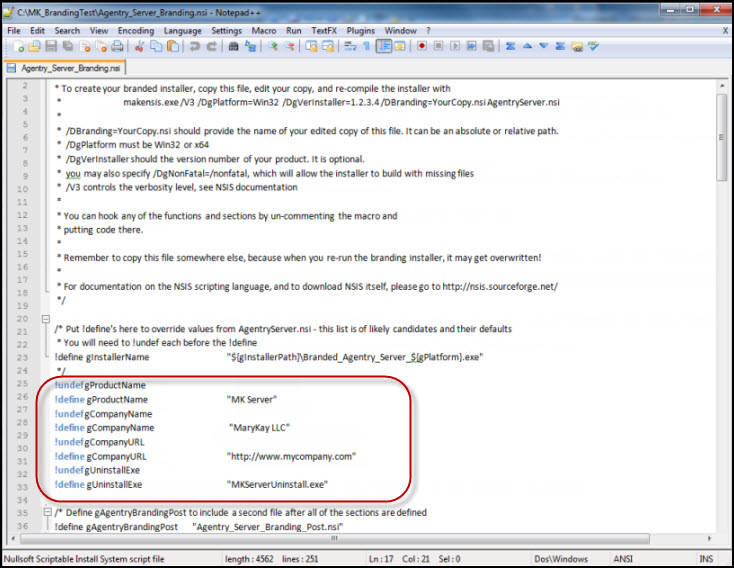
Here is a screen
shot of the text editor, highlighting the lines you would typically
modify for the Server installer.

- Once you have downloaded and customized the Agentry
Client.nsi files,
you must recompile the installer to incorporate the branded files.
- Open a Command Prompt and follow the instructions
to compile the installer.
An example of the command for the Client installer
would be:
“c:\Program Files (x86)\nsis\makensis.exe” /DgPlatform=Win32 /DBranding=c:\MK_BrandingFiles\MK_Client_Branding.nsi AgentryClient.nsi
- Re-run the Client installers and check that your custom
modifications properly display in the applicable installation Wizard.
You now have branded installers for the Agentry
Client.
Next
If you want to do more extensive branding, such as adding
your company logo, you need to go to the Nullsoft Web site for programming
instructions.
