Creating an iOS Project

Set up and create an iOS client application in the Xcode IDE.

Prerequisites
Task
  1. On your Mac, start Xcode and select Create a new Xcode project.
  2. Select iOS Application and Single View Application as the project template, and then click Next.
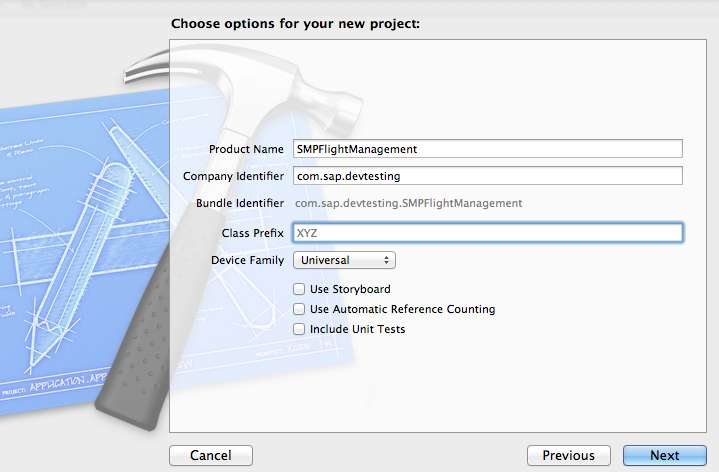
  3. Specify these values and click Next.
    1. Enter SMPFlightManagement as the product name.
    2. Enter com.<MyCorporation>.<BundleID> (or another value as needed) as the company identifier.
      Note: You may enter the class prefix, as needed. It is not mandatory to enter the class prefix.
    3. Select Universal as the device family product.
    4. Unselect Use Storyboard.
    5. Unselect Use Automatic Reference Counting.
    6. Unselect Include Unit Tests.
      New_Project_iOS
  4. Select a location in which to save the project and click Create to open it.

    Xcode creates a folder, SMPFlightManagement, to contain the project file, SMPFlightManagement.xcodeproj, and another SMPFlightManagement folder, which contains a number of automatically generated files and a build folder. By default, ViewController.h and ViewController.m classes are added in the SMPFlightManagement folder along with AppDelegate.h and AppDelegate.m files.

  5. Verify that the SDK and deployment targets are correct:
    1. Select SMPFlightManagement in Project Navigator and then select Build Settings.
    2. Under Project, select SMPFlightManagement.
    3. Verify that Base SDK under Architectures is set to Latest iOS (iOS 5.0).
    4. Select Info and set the iOS Deployment Target to iOS 5.0 .
    5. Select Targets > SMPFlightManagement and verify that those values are also set.
    Note: For deploying on iOS simulator, accept the default values under Code Signing. For deploying on a device, set the required provisioning profile. See the iOS Provisioning Portal documentation on the Apple Developer Website: https://developer.apple.com/devcenter/ios/index.action .
Next
Add libraries, resources, and source code to the SMPFlightManagement Xcode project.