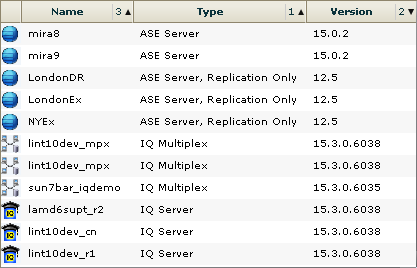
Use data display features to view resource status and to sort, search by resource name and type, and rearrange status information.
Column Options
The Perspective Resources view, Resource Explorer, Administration Console, Alert Monitor, heat chart, and other views in SAP Control Center—including those in product modules—use a tabular grid format to display information about managed resources. You can use options provided by the grid format to sort and organize displayed data.
| Sorting Option | Description |
|---|---|
| Simple column-based sorting | Click a column name to sort the table based on that column in ascending or descending order. The arrow in the column’s sorting tab (to the right of the column name) points up when data is sorted in ascending order or down when data is sorted in descending order. |
| Reversing the order of a column-based sort | Click a column’s sorting tab to reverse its sort from ascending to descending order or vice versa. |
| Nested sorting based on multiple columns | Click the column name for the primary sort. For subsidiary sorts, click the column’s sorting tab. Choose the columns for subsidiary sorts in the order you want to apply them. After you click a sorting tab, it displays its sorting level (1 for the primary sort, 2 for the secondary sort, and so on). Click any column name to clear the nested sort. |
| Rearranging columns | Move columns by dragging and dropping them. |
The figure below shows a table of servers sorted first by resource type; within type by software version; and within version by server name. The Type and Name columns sort in ascending order and the Version column sorts in descending order.

Filter by Column
- Enter the name of a resource at the top of the Name column to display only that server, database, group, or other named object. The display reacts as you enter each character, so you might not need to enter the entire name.
- Enter a version number at the top of the Version column to display only resources running that software version.
You can filter on multiple columns; for example, in a listing of servers, use the Status column to display only running servers, then use the Version column to display servers using the desired software version. Delete the filtering terms to return to the original display. Filtering terms are not case sensitive.
Full Screen Mode
To increase the screen area available in
SCC for views and perspectives, click the 
Maximize a Section of a View
Some areas
within views have a square minimize/maximize icon (
View Menu
- Display the filtering tool for searches. (In the heat chart, the Filter option also displays the column selection tool.)
- Toggle between an icon view and a detail view of your resources (Perspective Resources view only)
- Refresh the display (Resource Explorer only)
Changing the Font Size
- Enter Ctrl-Alt + to enlarge display fonts.
- Enter Ctrl-Alt - to shrink display fonts.