Configuring Connection Settings for the Synchronization Software

Install and configure Microsoft ActiveSync so you can deploy and run device applications on an emulator. If you install Visual Studio 2008, the Windows Mobile Device Emulators (Windows Mobile 5) and Device Emulator Manager are already installed.

Note: Microsoft ActiveSync is for Windows XP. If you are using Windows Mobile 5.0, you must install Virtual PC 2007 SP1 to connect. If you are using Windows Mobile 6.0 or later using Active Sync to connect on Windows XP, use Windows Mobile Device Center to connect on Windows Vista and late Windows OS. You can download the Windows Mobile Device Center from http://www.microsoft.com/windowsmobile/en-us/downloads/microsoft/device-center-download.mspx.
  1. Install the Windows Mobile 6 Professional SDK. You can download it from http://www.microsoft.com/downloads/details.aspx?familyid=06111A3A-A651-4745-88EF-3D48091A390B&displaylang=en#AdditionalInfo.
  2. Download Microsoft ActiveSync from the http://www.microsoft.com/windowsmobile/en-us/help/synchronize/device-synch.mspx. Save it to your local machine. Windows XP requires version 4.5.
  3. In Windows Explorer, double-click setup.msi to run the ActiveSync installer.
  4. Follow the steps in the ActiveSync installer to complete the installation.
  5. When installation is complete, restart your machine.

    ActiveSync starts automatically, and its icon appears in the Windows toolbar.

  6. Double-click the ActiveSync icon.
  7. Select File > Connection Settings.
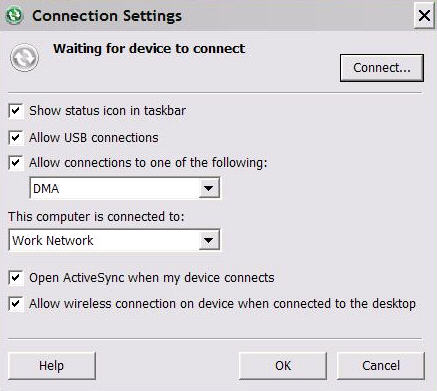
  8. In the Connection Settings dialog, select all the check boxes.
  9. Under "Allow connections to one of the following", select DMA.
  10. Under "This computer is connected to", select Work Network.
    Configure ActiveSync
  11. Click OK.