You cannot change any of these default start-up parameters unless you directly edit the Windows NT Registry values. However, you can use Server Config to specify additional start-up parameters.
Additional start-up parameters include any valid server command-line options listed for the sqlsvr and bcksrvr descriptions in the Adaptive Server Utility Guide for your platform. For a description of start-up parameters for Monitor Server and Historical Server, see the Adaptive Server Monitor documentation.
![]() Specifying additional start-up parameters
Specifying additional start-up parameters
Log in to Windows NT using an account with Windows NT administrator privileges.
Start Server Config.
Select the Adaptive Server icon, the Backup Server icon, or the Monitor Server icon to indicate which type of server you want to configure.
Select Configure Adaptive Server, Configure Backup Server, or Configure Monitor Server to display a list of available servers on your system.
Select the name of the server to configure, and choose Continue.
If you are configuring Adaptive Server, enter the login name and password of a user with System Administrator privileges, and choose Continue.
Or use the default Sybase “sa” login, which does not require a password.
If Adaptive Server is not running, Server Config asks you to start it now; choose Yes.
Select the Command Line button.
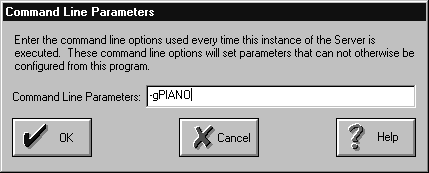
Server Config displays the Command Line Parameters dialog box:

This example, using the -g parameter, specifies “PIANO” as the name of the machine used to log that server’s error messages.
Edit the text in the Command Line Parameters box to include the additional start-up parameters and values you require.
Do not specify the default command line parameters listed in Table 2-1. For details on available command-line parameters, see sqlsvr and bcksrvr in the Adaptive Server Utility Guide for your platform, and the Adaptive Server Enterprise Monitor documentation.
Choose OK.
Choose Save in the server’s configuration dialog box.
Exit Server Config.