Setting up the repository database server

The repository administrator must set up the repository on a database server.

  1. Choose a server on which to install the repository. The server must be accessible to all those who will need to work with the repository.
  2. Install or obtain access to a DBMS suitable to store the repository tables. For this step, you have two options:

    • Install the authenticated version of Sybase SQL Anywhere 10 provided with PowerDesigner. For detailed instructions, see Installing SQL Anywhere.

    • Use your own DBMS

  3. Create an empty database to host the repository, with an administrator user who has full rights on all the tables. For instructions on performing this step with SQL Anywhere, see Installing SQL Anywhere.
  4. On a client machine, with PowerDesigner installed, create a direct repository definition to connect to the new database by selecting Repository > Repository Definitions .

    For detailed information about creating repository definitions, see the Working with the Repository book.

  5. Enter an appropriate name to identify the repository, the user name ADMIN, and then press F4 to open the Select a Data Source window. Select the type of data source that you want to use to connect to the repository database. If it already exists, select it in the list; otherwise, click the Configure button and configure it as necessary.

    For detailed information about creating, configuring, and using connection profiles, see "Connecting to a Database" in the Models chapter of the Core Features Guide.

  6. Select Repository > Connect to open the Connect dialog. Select the name of the repository definition you just created and click OK to connect. A message box is displayed inviting you to install the repository. This will involve running a SQL script to create the necessary tables. Click Yes to continue.
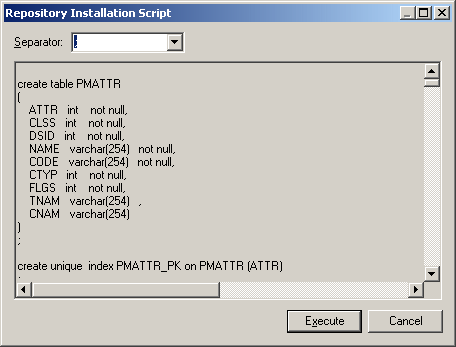
  7. The read-only Repository Installation Script window opens. Click Execute to run the script and create the repository tables:

    When the repository has been successfully installed, a final message "Repository installation completed" is displayed in the Output window. In the repository Browser, the root of the repository tree now displays the repository name, the repository user and the current branch (MyBase::ADMIN::<Default>), and is ready for use.

Notes:


  • By default, database tables are owned by the user who creates them. Each repository user should either use the same database user name and password to access the repository, or have an account that gives them full rights over all the tables

  • Although you cannot edit the script in the Repository Installation Script dialog, you can, nonetheless, modify the statements (for example, to add physical options). To do this, you would need to copy the script to an external SQL editor, make the appropriate edits, and then connect to the database to execute the script outside of PowerDesigner. The Separator list in the dialog lets you select the separator appropriate to your interpreter.

  • Rarely, repository installation may fail due to network problems, insufficient disk space, or permission problems. In this situation, you can choose whether to ignore the errors or abort the installation. We recommend that, if you are unsure, you abort the installation, and recommence.

  • Repository models are stored as efficiently as possible, with only changed objects being re-saved. If a design team works on a 5-MB model for one year with, on average, eight check ins per week, there are around 400 versions in the repository. The size of the original baseline version will be around 10 MB. Each version will be about 5% of the total size of the model, so that total volume of versions is around 200 MB, and you will need around 210 MB of space in total.
Send your feedback on this help topic to Sybase Technical Publications: pubs@sybase.com

Your comments will be sent to the technical publications staff at Sybase, Inc. For product-related issues or technical support, contact Sybase Technical Support at 1-800-8SYBASE.