You control how elements defined in an XML schema are imported by mapping them and their attributes, compositions, and aggregations to objects in the PowerDesigner metamodel. The XML schema is analyzed and presented as a list of metaclasses on the left side of the Mapping Editor and the PowerDesigner metamodel (and any extensions) are displayed on the right side.
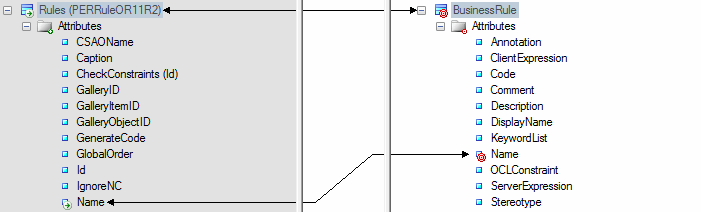
- Drag and drop an external metaclass to a PowerDesigner metaclass to create an
import mapping. Any external attributes and collections are automatically mapped
to PowerDesigner attributes with which they share a name:
By default, the Mapping Editor lists the standard attributes and collections of metaclasses, which are normally displayed in object property sheets. To display all available properties, click the Filter Properties tool, and select Show All Properties. You can also filter the tree by using the Filter Mappings and Filter Objects tools.
Note: If no suitable metaclass exists, to create and map to a new extended metaclass based on the ExtendedObject metaclass, drag and drop the external metaclass onto the PowerDesigner metamodel root. - Drag and drop additional attributes under the metaclass to PowerDesigner
attributes with compatible data types to create mappings for them. Attributes
are contained in a folder under the metaclass and represent individual
properties such as Name, Size, DimensionalType, which have boolean, textual,
numeric, or object ID values:
PowerDesigner identifies sub-object metaclasses in the schema that are limited to a single instance and displays a 1 overlay on their icons. Attributes under such metaclasses are treated as belonging to the parent metaclass and can be mapped to attributes under the PowerDesigner object with which the parent is mapped:
Note: If no suitable attribute exists, to create and map to a new extended attribute, drag and drop the external attribute onto the PowerDesigner metaclass to which its parent is mapped. - Drag and drop external sub-object metaclasses (compositions) under the
metaclass to PowerDesigner compositions to create mappings between them:
Any attributes under the sub-object metaclass are automatically mapped to PowerDesigner attributes with which they share a name. Map other sub-object attributes as necessary.Note: In certain circumstances, it may be appropriate to map an external sub-object metaclass to a PowerDesigner object metaclass, and so such mappings are also permitted. - Drag and drop external collections (aggregations) under the metaclass to
PowerDesigner collections to create mappings between them:
- In certain schemas, it may be necessary to identify attributes as references
and identifiers to link one metaclass to another through aggregation:
- Right-click an attribute and select Declare as Object
Reference to specify that it acts as a pointer to
another object. Such attributes often have a type of GUID, Token, or
NCName (PowerDesigner automatically identifies attributes of type IDRef
as references). A rounded arrow overlay is added to the attribute
icon:
- Open the metaclass that the object reference points to, select its
identifying attribute, right-click it, and select Declare as
Unique Identifier. A key overlay is added to the
attribute icon:
- The object reference attribute can now be mapped to a PowerDesigner
attribute of type object (which also bears a rounded arrow
overlay):
- Right-click an attribute and select Declare as Object
Reference to specify that it acts as a pointer to
another object. Such attributes often have a type of GUID, Token, or
NCName (PowerDesigner automatically identifies attributes of type IDRef
as references). A rounded arrow overlay is added to the attribute
icon: