You can create your own menu items in the PowerDesigner Tools menu to access PowerDesigner objects using your own scripts or executable programs. You can define up to 256 commands in the Customize Commands dialog, and control the contexts (model, diagram, and target type) in which they appear.
- Enter the following properties:
Property Description Name
Specifies the name of the command that will appear in the menu. Names must be unique and can contain a pick letter (&Generate Java will appear as Generate Java)
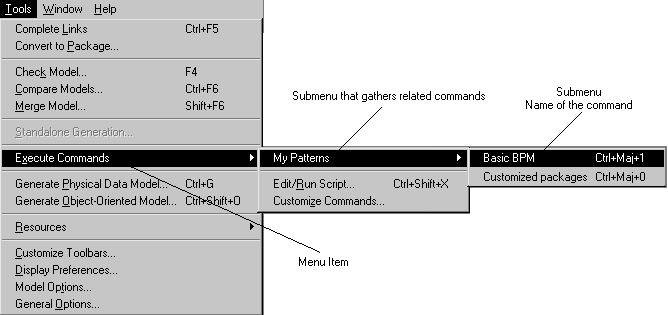
Submenu
Specifies a submenu in which to place the command. You can enter your own or select one of:- <None> - directly under
- Check Model
- Export
- Generation
- Import - also appears under
- Reverse - also appears under
Context
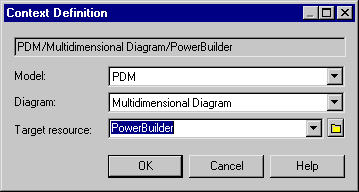
Specifies when the command is available. By default the command is available at all times (*/*/*). Click the ellipsis button to restrict the display of the command to a specific:- Model type - for example OOM/*/*
- Model and Diagram type - for example OOM/Class diagram/*
- Model, Diagram, and Target type - for example OOM/Class diagram/Java. By default, the list contains extensions available for the chosen model type. Click the Path tool to navigate to another folder containing extensions or DBMS or language definition files.
Type
Specifies whether the command will launch an executable or VBScript.
Command Line
Specifies the path to the executable or script file to run. Click the ellipsis button to navigate to a file. If your file is a VBScript, you can review or edit the script by clicking the Edit With tool in the toolbar.
Comment
Specifies text that is displayed in the status bar when you select the command.
[S]how in Menu
Specifies that the command should be displayed. Deselect this field to hide the command while retaining its definition.
Accelerator Key
Associates one of ten reserved keyboard shortcuts Ctrl-Shift-0 to Ctrl-Shift-9 with the command.
- Click OK to save your changes.
Your command is now available under .
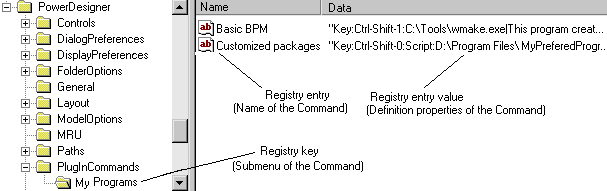
Note: Customized Commands are saved by default in the Registry at HKEY_CURRENT_USER\Software\Sybase\PowerDesigner v\PlugInCommands\submenu and are available only to the user defining them. To make them available to all users, create an entry at the same location under HKEY_LOCAL_MACHINE.The name of the entry is the name of the command, and its value takes the following syntax, in which only the commandline parameter is mandatory and must be terminated by a | (pipe) character[Hide:][Key:accelerator:][Script:]commandline[ |comment]
If you want to insert a pipe within a command, you must escape it with a second pipe.