Chart Report Items

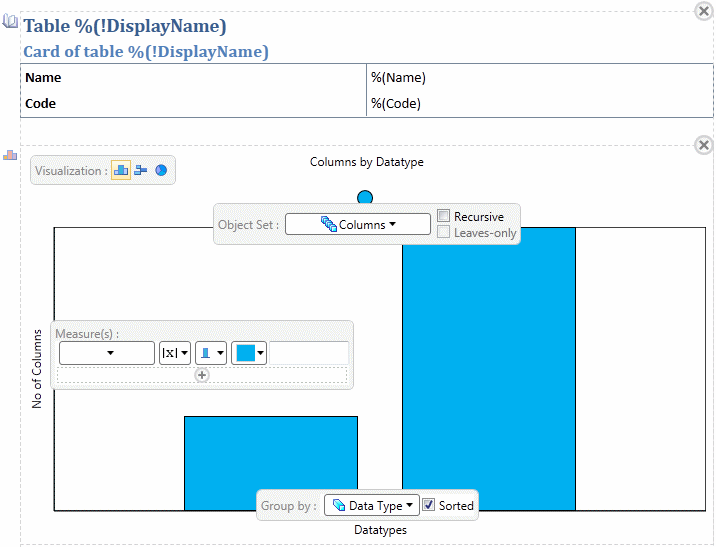
Chart report items provide a way to visualize statistics about a collection of objects as a column, bar, or pie chart.

  1. To insert a chart item, click in the Design or Outline view in the position where you want to add the item and then double-click or drag and drop the Chart tool.
    The position in which you drop the chart determines the statistics that you can visualize. In this example, the chart is a child of the Table book, which provides access to the Columns sub-object collection. To analyze tables or any other collection of standard objects, you should drop the chart at the top level of your report. You can base a chart on any of the standard collections in the PowerDesigner metamodel, or create you own extended or calculated collection to analyze (see Customizing and Extending PowerDesigner > Extension Files).Reports - Chart
  2. Select the type of visualization to use. You can choose between:
    • Column chart - vertical columns and/or line graphs.
    • Bar chart - horizontal bars or and/or line graphs.
    • Pie chart - a circle divided into sectors.
  3. Specify the parameters of the chart:
    • Object set - Specifies the collection of objects that the chart will analyze.
      • Recursive - Specifies that the chart should include all sub-objects in the case of composite objects such as EAM architecture areas or BPM processes, and objects in packages. In the case of composite objects, selecting the Leaves-only sub-option restricts the data set to only those final objects in the tree that are not further decomposed.
      Note:
    • Group by - Specifies the property that will be used to categorize objects for display. If you select nothing or the Name property, then one bar or segment will be displayed for each object. If you select a property of type date, you can choose to group by day, week, month, quarter, or year.
    • Measure(s) - Specifies how the size of bars or segments will be calculated. While a pie chart can only support one measure, column and bar charts can support multiple measures. For each measure, you can also specify:
      • The measure type - Count is always available, and sum and average are available for numeric properties.
      • The base color from which the color scheme is determined and the label to give to the measure. For column or bar charts, you can also specify whether the measure is represented as bars/columns or as a graph line.
  4. Replace the placeholder text to the left of, below, and above the chart to give labels to the x and y axes and to provide a title for the chart.You can specify to print the column or bar names diagonally using Primary and Secondary Axis Labels Rotation Angle properties in
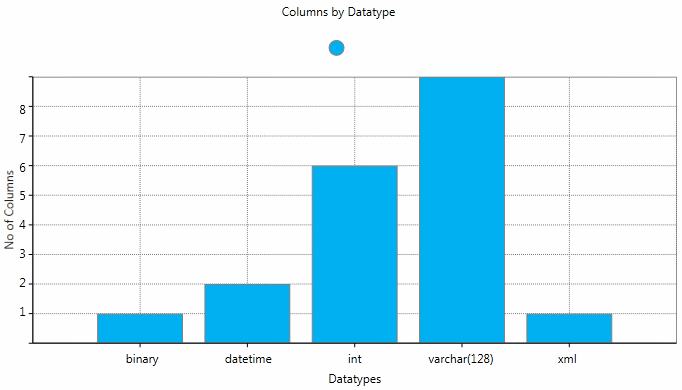
 the Properties view.
    Note: The graphic displayed in the Design view is for illustration purposes only. To preview your chart with actual data, click the chart background and then click the Quick View tool.

    Reports - Chart Preview
  5. To modify the default styles for a chart item, click its icon to display the command bar, and then click the Styles tool (see Specifying Global Styles and Local Formats for Report Items). To override the default styles for this instance, click the Format tool.