List and Card Report Items

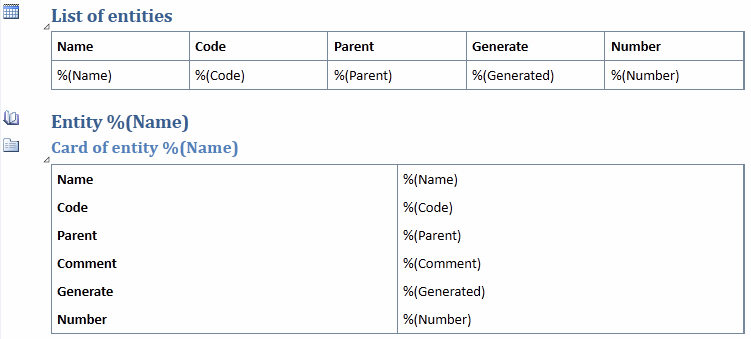
List and card report items are generated as tables. A list displays all objects, with one column per property and one row per object. A card displays a single object, with one row per property. You can specify which attributes will be displayed, in which order, and the width of the columns.

  1. To insert a list or card item, click in the Design or Outline view in the position where you want to add the item and then double click or drag and drop the appropriate Toolbox item.

    Reports - Card and List
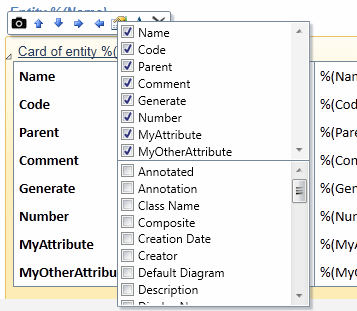
    The available items depend on the type of your model and the objects in your model.
    Note: Cards and lists are commonly added to the report as part of a book (see Book Report Items).
  2. To modify the properties displayed, click the card or list icon in the Design view to display the command bar, and then click the Properties tool to display a list of available properties, with properties selected for display at the top, and unselected properties listed in alphabetical order at the bottom:


  3. Select or deselect properties as appropriate and then click outside the list to close it. Properties selected will be added as columns in a list or rows in a card.
    Note: All properties, including extended attributes are available for selection in this list.
  4. To reorder list columns or card rows click in a list column header or card row header to select it, and then click again and drag and drop it to the desired position.
  5. To modify the width of list columns or the column separating the card row header from the property values, hover over a dividing line until the double-arrow cursor appears, and then click and drag to increase or decrease the width.
  6. To modify the default styles for a list or card item, click its icon to display the command bar, and then click the Styles tool (see Specifying Global Styles and Local Formats for Report Items). To override the default styles for this instance, click the Format tool.