The Report Wizard provides an easy way to create a report, select model objects and format them. The wizard can be launched from your model to create a new report, or from the Report Editor to configure an existing report. You can complete as much of the Wizard as you want. At each step, you click Next to advance to the next stage, or Finish to create a report based on your selections so far.
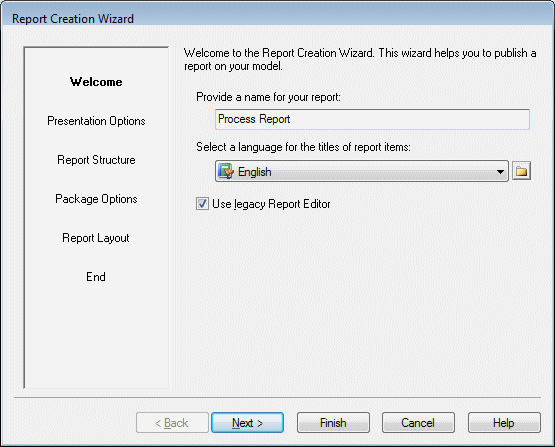
- Specify a name for the report and the language in which you
want its titles to appear, and then click Next.Note: [optional] To use the new report format and editor (see The Report Editor), deselect Use legacy Report Editor.
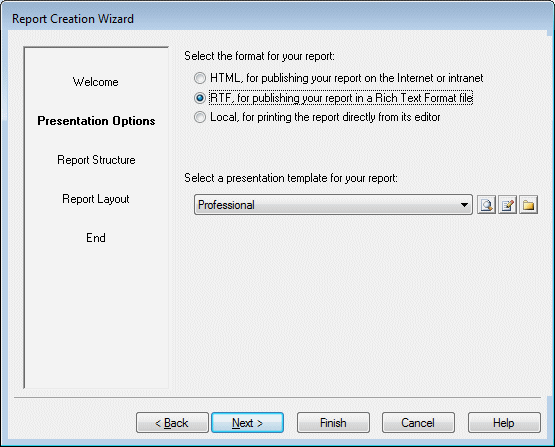
- Select whether you want to prepare your report for publishing as HTML or RTF, or for direct printing, select a presentation template, and then click Next.
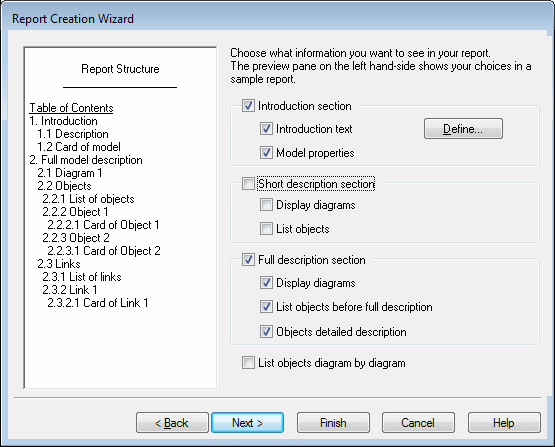
- Specify the types of information that you want to appear in
your report, and click Next.
The preview pane on the left hand-side displays a sample report that changes dynamically according to your selections. You can select any or all of the following options:- Introduction section – Inserts a page break followed by an introduction section, which can contain a paragraph of Introduction text (click the Define button to enter text), and a card listing the Model properties.
- Short description section – Inserts a
page break followed by a short description section, which can
Display diagrams (including the Diagram
book with a picture of each diagram with its description and
annotation) and List objects (with a list for
each type of object in the model).Note: RQM views are not diagrams and cannot be published graphically.
- Full description section – Inserts a page break followed by a full description section sub-heading, which can display all the elements from the short description section plus the Objects detailed description (a book item for each object type).
- List objects diagram by diagram - [except RQM] Instead of a flat display of object types, displays objects sorted by the diagram in which they are displayed. Global objects, such as business rules, do not belong to a specific diagram, and are therefore listed in their own section under the root.
- [if your model contains packages] Specify whether you will
report on the whole model or only a package and whether you will ignore the
package structure, or organize objects under a flat list of packages or a
hierarchical list of packages (where sub-packages are children of their parent
package), and then click Next.
The preview pane (on the left hand-side) changes dynamically in order to preview your selection.
Note: Global objects, such as business rules, are always included, even if you select a package, and composite objects, such as OOM activities or processes, are always displayed hierarchically, even if you have selected a different package option. Only the hierarchical structure is supported for HTML reports or RQM reports. - Specify the types of object that will be included in your
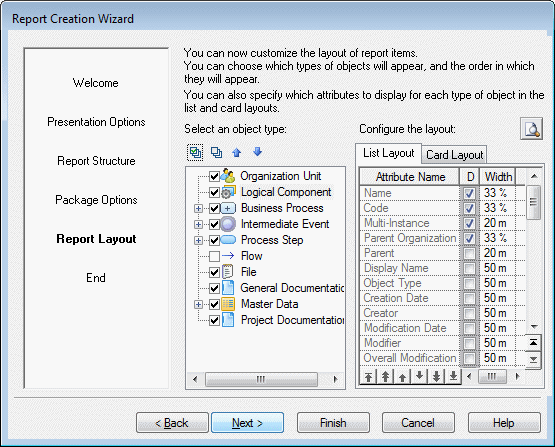
report, along with the properties that will be displayed in each of their list
and card report items, and then click Next.
- To include an object type in the report, select its check box in the list. You must select at least one object type. Click on the plus sign to the left of an object to select sub-objects. Use the Move Up and Move Down tools to reorder the list (sub-objects cannot leave their parent scope). New types of objects defined in extensions (stereotypes used as metaclasses) are listed after their parent object type.
- To control the properties included for an object type in lists and cards, select the List Layout or Card Layout tab and use the following columns
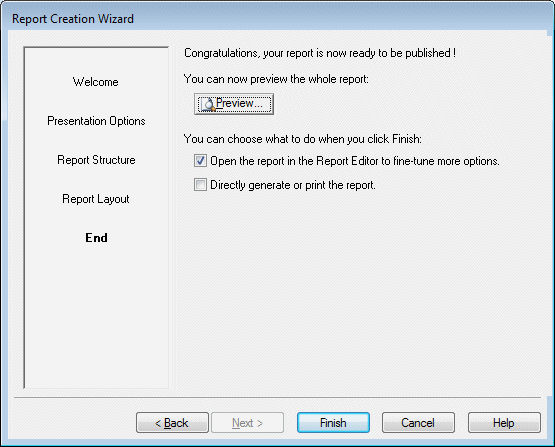
- Optionally preview your report, and select to open it in the report editor and or directly generate or print it, and then click Finish.