Customizing Menus, Toolbars, and Toolboxes

To customize PowerDesigner menus, toolbars, and toolboxes, select Tools > Customize Menus and Tools.

Note: An administrator can prepare customized UI profiles, which are made available to users on their first connection to the repository (see Controlling Defaults for Menus, Toolbars, and Toolboxes).
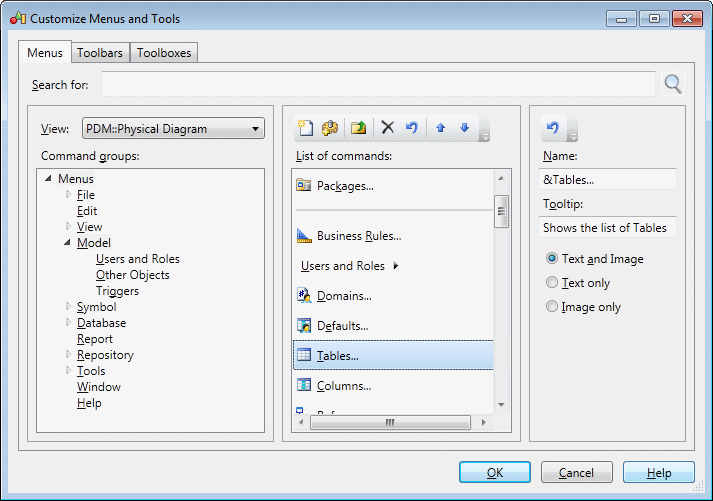
  1. Select Tools > Customize Menus and Tools. The dialog opens to the Menus tab, initialized to your current view (here, the PDM Physical Diagram):

    Customize Menus
    Note: Search for any command available in the present context by entering it in the Search for field and clicking Find.
  2. [optional] Select a different view to customize. The following views are available:
    • No View - when PowerDesigner is running but no model is open and selected.
    • Type Diagram - each diagram is listed separately.
    • All Views - provides a union of all the menus available in all possible views.
    Note: You can make changes in multiple different views. All your UI preferences are saved in a single resource file.
  3. Navigate to and select a command group (menu or submenu) to modify in the tree in the left panel. The commands that are available on the selected menu, submenu, toolbar, or toolbox are listed in the middle panel.

    The middle panel shows the contents of only one level at a time. To see the contents of a submenu, double-click it to descend into its commands. Click the Go Up One Level tool to return to the parent menu. For example, to see the contents of the Repository > Administration submenu, expand the Repository node in the left panel, and select the Administration node, or click the Repository node in the left panel, and double-click the Administration node in the middle panel.

    Note: The special commands in the format <Command> such as <Recent Files> and <New Diagrams> are placeholders for points where the menu dynamically calculates commands to insert. The <Stereotypes used as Metaclass> placeholder, which is present by default in the Model menu, instructs PowerDesigner to insert a command to open a list of objects for each type of new object defined in a model definition or extension file (see PowerDesigner Resource Files). If you remove this command from this menu, then all such object lists will be hidden. If you want to display such object lists under another menu, then you must add both the parent metaclass from which they are derived and the <Stereotypes used as Metaclass> placeholder.
  4. Use the tools in the middle panel to add, remove, reorder, or otherwise modify the commands of the selected command group:
    Tool Description

    Tools - New Menu
    Create New Menu - Creates a new sub-menu to add to the command group.

    Tools - Add Command
    Add Commands - Opens a selection dialog to add a command to the selected command group. The Add Commands dialog has a Pick Command tab to let you select available commands from a tree and a Filter Commands tab to let you filter the list of available commands by entering a string. When you have located the command to add, select it and click OK.

    Tools - Go Up One Level
    Go Up One Level - Displays the commands of the parent menu of the currently selected menu.

    Tools - Delete
    Remove - Deletes the selected command from the command group.

    Tools - Reset
    Reset List - Undoes any changes to the command group.

    Tools - New Separator
    Move Up - Moves the selected command up one place in the list.

    Tools - Move Down
    Move Up - Moves the selected command down one place in the list.
  5. [optional] Select a command in the middle pane and use the fields in the right pane to change its name, tooltip, and display method (text and/or image).
    Note: Inserting an ampersand sign in the Name field before a letter enables its use as an Alt key menu shortcut. For example, the File menu has, by default, its name defined as &File so that users can press Alt+F to activate this menu.
  6. [optional] Select the Toolbars (see Organizing Toolbars) or Toolboxes (see Creating Objects from the Toolbox) tab to customize these UI elements.
  7. Click OK to save your changes and apply them to your environment.