Planning Your PowerDesigner Installation

The deployment of PowerDesigner® typically involves the installation of a license server, one or more repository components, and a number of client machines.

A PowerDesigner environment can contain the following servers, components, and client machines:
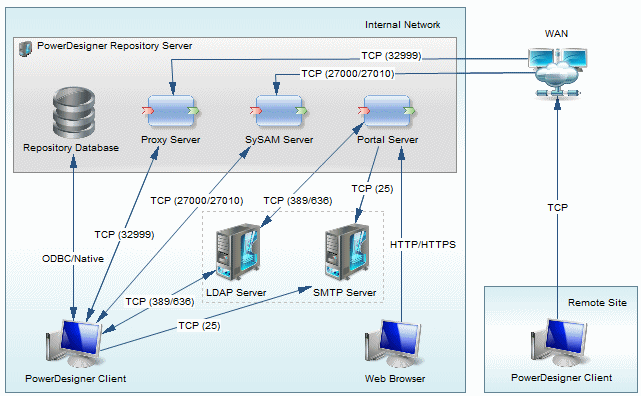
  • The PowerDesigner repository server components are commonly installed on a single server:
    • Repository Database - Required if using the repository.
    • Proxy Server (Windows only) - Required if using the repository proxy.
    • SySAM Server - Required if using served or floating licenses.
    • Portal Server - Required if using the PowerDesigner Portal.
    These components can, alternately, be installed on separate servers, to make use of an existing database server, or to spread the processor load to maximize performance:

  • Local servers - PowerDesigner can connect to these servers in your local environment:
    • LDAP Server - to delegate the authentication of repository users.
    • SMTP Server - to automate the sending of email notifications.
  • Client machines - Allow users to access the repository using the following applications:
    • PowerDesigner Client - Can access the repository directly or through the proxy. PowerDesigner can be installed on standard Windows machines or accessed via a virtual machine or from a central server location. Clients at remote sites are recommended to use a proxy connection.
    • Web Browser - Can access the repository through the PowerDesigner Portal.
Note: For installation of PowerDesigner without a repository, perform steps one and two of this procedure and then go directly to Installing PowerDesigner.
  1. Obtain your license key file (see Obtaining a License).
    If you do not have a license key, you will only be able to install PowerDesigner for a 15-day trial period.
  2. Install the Sysam license server (see Installing a License Server).
    The license server is required if you intend to share served licenses among users instead of assigning individual licenses per machine.
  3. Install PowerDesigner on the administrator's workstation (see Installing PowerDesigner).
    This initial installation is needed to install the PowerDesigner repository, which is used to store and share models.
  4. [optional] Install the repository to the administrator's workstation for testing and experimentation (see Installing a Local Test Repository).
  5. Choose a server capable of supporting large, long-running transactions to host your repository. We recommend as a minimum, a dual-core machine, with 2-4GB of RAM, but the exact system requirements depend on your DBMS, the number of concurrent users, and the size of your repository.
    Note: To calculate the size required for your repository database, estimate the number of models that will be stored and the period during which they will be developed. An average model containing 100 primary objects (tables, classes, etc.) will have an initial disk size of 5MB and the size of its initial check in will be around 10MB. Assuming an average number of edits, each subsequent check in will add 10% to the size of the file, so that after an average development period of two months (40 working days) with one check in per day, the final model file size will be 10MB*1.140 or approximately 500MB. If your team will develop 20 such models during the course of the year, you should allow 10GB of space for your repository database.

    If you want to use the repository proxy or PowerDesigner Portal, you should install them, by preference, on the same machine where the repository is located to optimize communication between the components. If the repository server is not a Windows server or is unable to support the additional workload, then we recommend installing these components on another machine on the same LAN segment.

  6. Install SQL Anywhere® on the repository server, create a database to house the PowerDesigner repository (see Installing and Authenticating SQL Anywhere), and create a service to run the database (see Running the Database as a Service).
    Alternatively, select or create a database using one of the other supported DBMSs:
    • Adaptive Server® Enterprise
    • Oracle 8 and higher
    • IBM DB2 Common Server and DB2 for OS/390
    • Informix 2000
    • Microsoft SQL Server 2005 and higher - we recommend that you use a server that is not currently managing a high transaction load, since PowerDesigner performs long- running synchronous transactions during Check-In/Check-Out.
    Note: The most up-to-date list of supported DBMSs, is available at http://certification.sybase.com.
  7. Install the repository to the new database (see Installing the Repository to the Server).
  8. [optional] Install the repository proxy on the repository server (see Installing the Repository Proxy).
    The proxy simplifies and offers more security for connection to your repository and may provide performance improvements in environments where clients will be connecting over a WAN or complicated LAN or when dealing regularly with large (15MB+) models.
  9. [optional] Install the PowerDesigner Portal on the repository server (see Installing the PowerDesigner Portal Server).
    The PowerDesigner Portal provides access to your repository models via a Web browser.
  10. Define a password policy, optionally connect to an LDAP server to delegate the authentication of repository users and an SMTP server for notifications, and create groups and user accounts with appropriate rights and permissions to control access to the repository (see Core Features Guide > Administering PowerDesigner > Controlling Repository Access).
  11. [optional] Customize the PowerDesigner interface to optimize it for various groups of users and define shared reference models and resources:
    • Prepare profiles to customize the PowerDesigner interface (by hiding types of models, objects, and properties and customizing menus, toolbars, and settings) and associate them with appropriate users and groups (see Core Features Guide > Administering PowerDesigner > Customizing the PowerDesigner Interface).
    • Prepare shared reference models and an enterprise glossary for deployment to users (see Core Features Guide > Administering PowerDesigner > Deploying an Enterprise Glossary and Library).
    • Prepare custom resource files (such as DBMSs, languages, and extensions) for deployment to users (see Core Features Guide > Administering PowerDesigner > Deploying an Enterprise Glossary and Library > Deploying an Enterprise Library > Sharing Resource Files via the Library).
  12. Install PowerDesigner on user machines (see Installing PowerDesigner).
    Note: If you are not using the repository proxy, you will also need to install the SQL Anywhere client (as part of the PowerDesigner installation) or an appropriate client or driver for your chosen DBMS on all client machines to allow them to connect to the repository.