System administrators can install PowerDesigner on a server and have
client machines run the application from this central install. The client machines do not
install any files but their registry is modified in order to be able to access PowerDesigner
from the specified location. With this type of install, there is only one instance of
PowerDesigner to deploy and upgrade, and you can choose any type of PowerDesigner license
and combination of installation options on each client machine.
- Insert the CD-ROM in the drive to automatically launch the setup program. The
initial setup dialog box is displayed. Click the Administrative
Installation button.
or
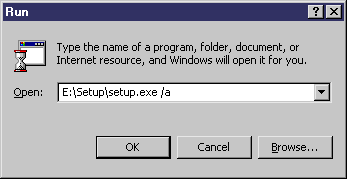
Select , type the PowerDesigner setup.exe path followed by /a in the
Run dialog box and click OK.
The welcome page is displayed.
- Click Next to display the network location page.
- Specify the network location where you want to copy the product files, which
must be read-accessible to client machines, and then click
Install.
You are not required to enter any product key or select any feature to
install. All PowerDesigner setup files are decompressed and copied to the
server, but the server registry and system files will not be affected. When
this process is complete, the complete page opens.
- Click Finish to exit the InstallShield Wizard.