Creating a View

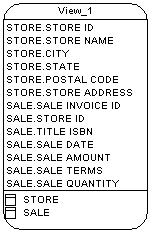
You can create a view from the Tools menu. This method allows you to automatically populate the view with columns from tables and other views.

You can create an empty view in the following ways:
  • Use the View tool in the Toolbox.

  • Select Model > Views to access the List of Views, and click the Add a Row tool.

  • Right-click the model (or a package) in the Browser, and select New > View.

To complete the view, specify a view query (see View Queries).

Alternately, you can create a view from the Tools menu.

  1. [optional] Select one or more tables and views in the diagram. You can select multiple objects by holding down the Shift key while you select them.
  2. Select Tools > Create View.

    If you have not selected any tables or views, then a selection box opens, allowing you to select the objects to be included in the view.

  3. Select the appropriate objects and then click OK.

    A view symbol is displayed in the diagram. It displays all the columns in each of the tables and views selected for the view. The names for the tables and views appear at the bottom of the view symbol.


  4. [optional] To remove unwanted columns or otherwise modify the view, edit its query (see View Queries).