You can modify an existing database schema by synchronizing it with your model.
The existing schema can be in the form of an archive model, a live database connection, a script file, or a model from the repository. The PDM (source model) and the existing database schema (target model) are merged using a database synchronization window, which allows you to choose which objects are added, deleted, or updated in the target.
- Select to open the Apply Model Changes to Database dialog box.
- Type a destination directory and filename for the script file in the Directory and File Name boxes.
- Specify the type of generation to perform. You can choose between a script and a live database connection.
- Specify how PowerDesigner will obtain the database schema to modify. You can choose between:
-
Using an archive model – Click the button to the right to browse to the archived model.
-
Using a data source – Click the button to the right to connect to your data source.
-
Using a script file – Select a script from the list or click the button to the right to browse to the script.
-
Using a model from repository – Click the Change Model Version tool to the right to browse to a version of the currently selected model.
- If you want to retain your existing data, select the Backup tables option. If this option is not selected, then all existing data will be erased. For details of this and other options on this tab, see Apply Model Changes to Database Dialog Options.
- [optional] If you want to change the default generation options, then click the Options tab ( see Apply Model Changes to Database Dialog Options).
- [optional] If you want to change the format of your script, then click the Format tab. This tab has the same functionality as in the Database Generation window (see Database Generation Dialog Format Tab).
- [optional] If you want to control which database objects will be modified, then click the Selection tab. This tab has the same functionality as in the Database Generation window (see Database Generation Dialog Selection Tab).
- Click OK. If you are using a live database connection, then the Reverse Engineering window will open, allowing you to select or clear check boxes in the target model for objects that you want to include or remove from the source model. Make your selections and then click OK to continue.
- The Database Synchronization window will open. Select or clear check boxes in the target model for objects that you want to include or remove from the model.
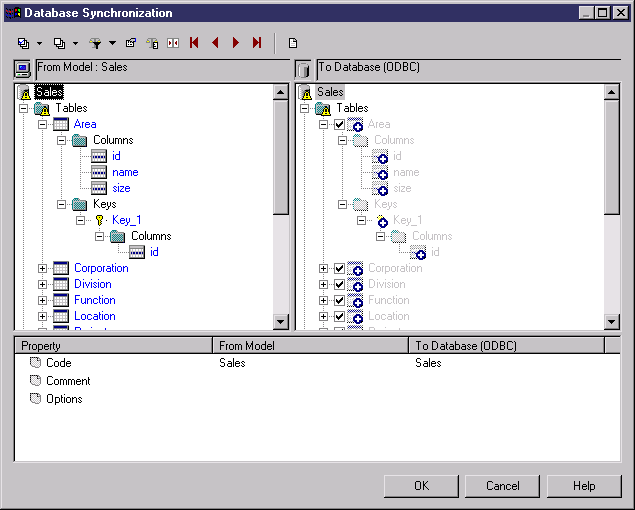
For more information on comparing and merging models, see Core Features Guide > The PowerDesigner Interface > Comparing and Merging Models.
- Click OK.
-
If you are generating a script, at the end of generation a result box opens listing the file path of the generated file. To open the script in a text editor, click the file in the result box and click the Edit button.
-
If you are generating a database directly, a Data Source connection box is displayed. Type your connection details and click the Connect button. A message box shows the progress of the generation process. At the end of generation click OK to close the box.