![]()
![]()
![]()
![]()
The following steps and screens show how to create a master/detail one-to-many or master/detail many-to-one form.
![]() To create a master/detail one-to-many
or master/detail many-to-one form:
To create a master/detail one-to-many
or master/detail many-to-one form:
Click the New button in the PowerBar.
The New dialog box displays.
Select the Object tab, the Form icon, and click OK.
The New Form dialog box displays.
Select Quick Select and either of the master/detail styles, then click OK.
![]() You must use Quick Select
You must use Quick Select and you can select only one master
table and one detail table when creating the form. After the master/detail
form is created, if you want to add data from another table, you
can modify the data source and add new columns.
You must use Quick Select
You must use Quick Select and you can select only one master
table and one detail table when creating the form. After the master/detail
form is created, if you want to add data from another table, you
can modify the data source and add new columns.
For information about modifying the data source, see Chapter 20, “Enhancing Forms”.
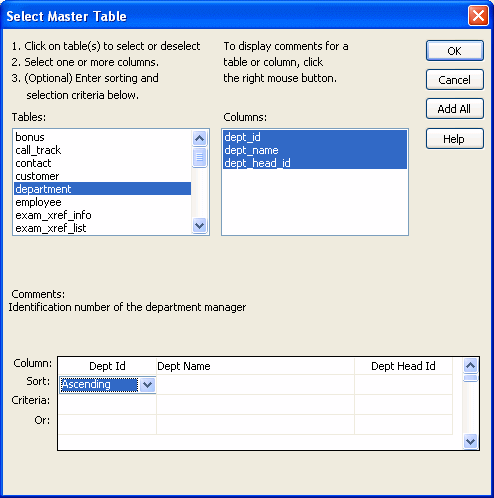
The Select Master Table dialog box displays.
Select the master table.
For a master/detail one-to-many form, this is the table whose data displays one row at a time at the top of the form. For a master/detail many-to-one form, this is the table whose data displays in a list at the top of the form. In the example, it is the Department table.
Select some or all of the columns in the master table, then click OK:
![]() If you are told the data is not updatable
After selecting the columns, you might see a message box telling
you that the data is not updatable. For information about these
situations, see “Defining data so that a form can update a database”.
If you are told the data is not updatable
After selecting the columns, you might see a message box telling
you that the data is not updatable. For information about these
situations, see “Defining data so that a form can update a database”.
The Select Detail Table dialog box displays.
Select the detail table.
This is the table that is related to the master table and whose data displays at the bottom of the form. For a master/detail one-to-many form, the data displays many rows at a time. For a master/detail many-to-one form, the data displays one row at a time. In the example, it is the Employee table.
Select some or all of the columns in the detail table, then click OK.
The Select Master/Detail Relationship dialog box displays. It lists primary/foreign key relationships between the master and detail tables:
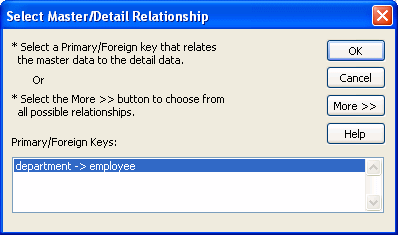
Specify the relationship between the master and detail tables.
To do this, you identify which column or columns in the detail table have the same values as the column or columns in the master table.
InfoMaker needs this information so that it knows which detail rows to display when you display a row in the master table.
If there is a primary/foreign key relationship, select it and click OK.
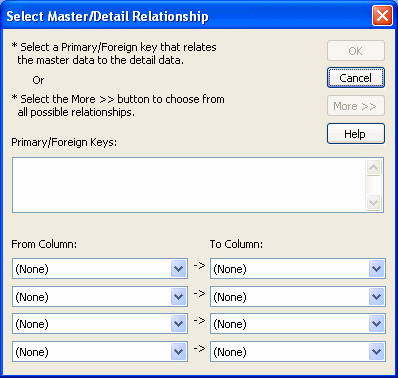
If there is no primary/foreign key relationship, click More to specify the relationship. Select one or more columns from the master table and the column or columns in the detail table that contain matching values, and click OK.
When the master table and the detail table are the same table, the complete Select Master/Detail Relationship dialog box displays automatically and you specify the relationship:
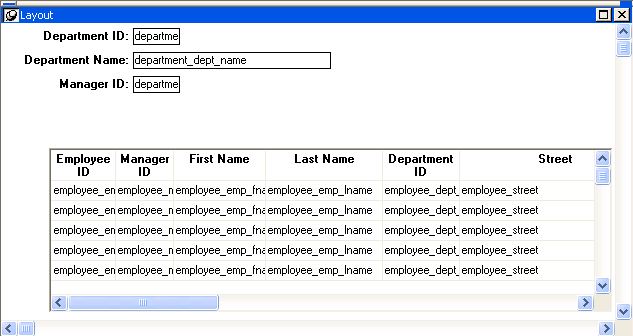
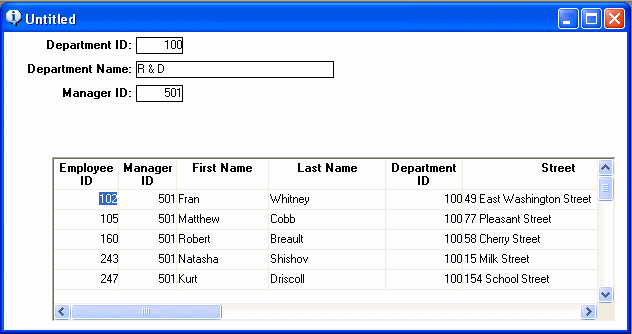
InfoMaker generates the basic form and displays it in the Form painter workspace. The following illustration shows a master/detail one-to-many form:
Size the master area if necessary and click the Run button to run the form.
When you run the form, the form displays with data:
At this point, you can enhance the form. To do so, you first click the Close button to return to the Form painter Layout view.
For information about how to enhance the form, see Chapter 20, “Enhancing Forms”.
