You can add the following drawing controls to a form to enhance its appearance: Line, Oval, Rectangle, and RoundRectangle.
![]() To add a drawing control to a form:
To add a drawing control to a form:
Click the drawing control in the Controls drop-down toolbar, or select one of the following from the menu bar: Insert>Line, Insert>Oval, Insert>Rectangle, or Insert>RoundRectangle.
Click where you want the control to display.
Resize or move the drawing control as needed.
Change the drawing control’s properties as needed in the Properties view.
For example, you might want to specify a fill color for a rectangle or thickness for a line. To do so, you work on the General page in the Property view for the rectangle or line control.
Drawing controls are useful for grouping controls in a form or providing design highlights. For example, to group some controls you can place a colored rectangle behind them by selecting Send To Back from the rectangle’s pop-up menu.
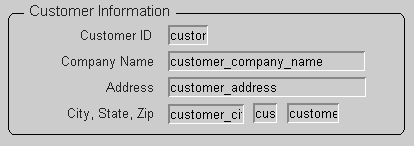
Here are some controls grouped with a round rectangle and a text label:

![]() To group controls with a round rectangle and text
in the Form painter:
To group controls with a round rectangle and text
in the Form painter:
Select Insert>RoundRectangle from the menu bar and add a round rectangle to the Layout view.
Size the rectangle and place it over the controls you want to group.
Select Send To Back from the rectangle’s pop-up menu to place the rectangle behind the group of controls.
Click the Text button in the Controls drop-down list, add a text control to the Layout view, and place it on the round rectangle.
Select a background color for the text control from the Background Color drop-down toolbar and select the color, in this case gray to match the rectangle.
Position all controls as needed.