![]()
Now you create a new window for the application. The window you create is a login window that allows the user to enter a user ID and password and connect to the database. The login window is a response window.
![]() About response windows
Response windows are dialog boxes that require information
from the user. Response windows are application modal. When a response
window displays, it is the active window (it has focus) and no other
window in the application is accessible until the user responds.
The user can go to other applications, but when the user returns
to the application, the response window is still active.
About response windows
Response windows are dialog boxes that require information
from the user. Response windows are application modal. When a response
window displays, it is the active window (it has focus) and no other
window in the application is accessible until the user responds.
The user can go to other applications, but when the user returns
to the application, the response window is still active.
Click the New button in the PowerBar.

The New dialog box displays.
Click the PB Object tab.
Select the Window icon and click OK.

The Window painter opens. Notice that you have two new toolbars, the StyleBar (with character style and text alignment buttons) and PainterBar3 (with color and border buttons, as well as grayed out control alignment buttons).
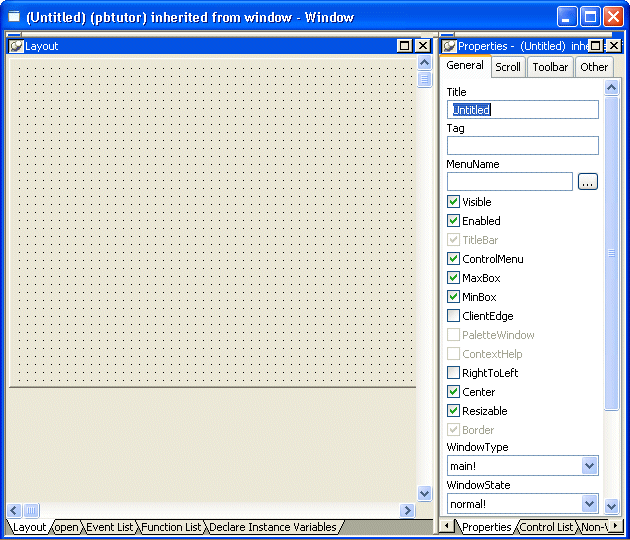
Make sure that the Layout view and the Properties view display in the Window painter.
You can display these views by selecting them from the View menu. If they are grayed out in the menu, the views are already displayed in the painter.
The default view layout scheme contains both views.
The rectangle in the Layout view represents the window you are building. The default properties in the Properties view indicate that the window is visible and enabled, and has the Main window type. You might need to scroll down in the Properties view to see the window type.

![]() If your window does not have a pegboard look
If the window
in your Layout view displays as a solid color, the Show Grid option
has been disabled. To enable it, select Design>Options from the menu
bar. Then select the Show Grid check box on the General page of
the Options dialog box. Click Apply, then OK to save the change
and close the dialog box.
If your window does not have a pegboard look
If the window
in your Layout view displays as a solid color, the Show Grid option
has been disabled. To enable it, select Design>Options from the menu
bar. Then select the Show Grid check box on the General page of
the Options dialog box. Click Apply, then OK to save the change
and close the dialog box.
Type Welcome in
the Title text box on the General page of the Properties view.
Select response! in
the Window Type drop-down list box.
Make sure the TitleBar and ControlMenu check boxes are selected.
Select the ContextHelp check box.
The ContextHelp property adds a question-mark button next to the (ControlMenu) close button in the login window’s title bar. Users of your application can click the question-mark button to trigger Help events for the window controls. You can add a question-mark button to a response window, but not to a main window.
Click the Other tab in the Properties view.
Type 2300 in the
Width text box and 1000 in
the Height text box.
Press the Tab key.
The size of the window rectangle in the Layout view changes. The values you type are in PowerBuilder Units (PBUs). You might need to modify these values later, while you are adding controls to the window.
![]() Other methods for entering position properties
You can use the spin controls to enter values instead of typing
them.
Other methods for entering position properties
You can use the spin controls to enter values instead of typing
them.

Alternatively, you can change the size of the login window in the Layout view by moving the pointer to the bottom or right edge of the window. When it turns into a double-headed arrow, you can drag the arrow to change the window size.
Select File>Save from the menu bar.
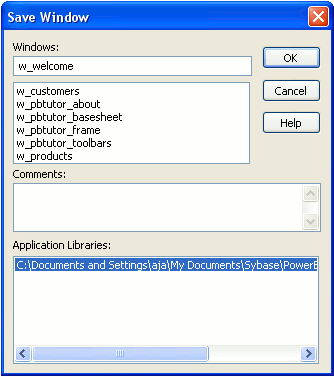
The Save Window dialog box displays. The only library in the Application Libraries text box is pbtutor.pbl, and it is selected.
Type w_welcome for
the window name.
The prefix w_ is standard for windows.

(Optional) Type the following lines in the Comments text box:
This is the login window. It requires the application user to enter an ID and a password before continuing.
These comments are visible in the List view of the Library painter.
Click OK.
PowerBuilder saves the new login window. If you expand MyWorkspace, pbtutor, and pbtutor.pbl in the system tree, you can see w_welcome listed under it.