Set up the iOS development environment by downloading the required plugins and import the associated iOS libraries into the iOS development environment.
Note: For more information on Xcode, refer to the Apple Developer
Connection: https://developer.apple.com/technologies/tools/.
- Start Xcode 4.6 and select Create a
new Xcode project.You can execute the OData libraries on architecture armv7 and armv7s.
- Under iOS, select Applications.
- In the right pane, select Empty Application as the project template and click Next.
- Enter <ProjectName> as the Product Name, <CorpID> as the Company Identifier, select Universal as the Device Family product, then click Next.
- Select a location to save the project and click Create to open it.
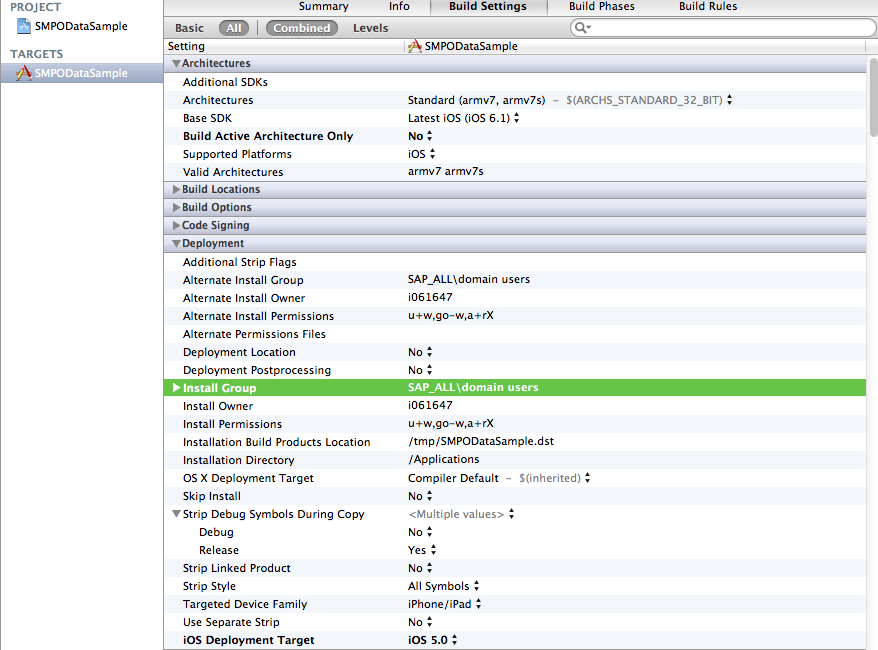
- Select the Build Settings tab and scroll to the Architectures section.
- Set Base SDK for All configurations to iOS 6.1.
- Select the Valid architecture as armv7 armv7s , Supported Platforms as iphonesimulator iphoneos , and the Targeted
device family as iPhone/iPad. This
ensures that the build of the application can run on either iPhone or
iPad.Note: When you migrate an existing project from an older version of Xcode to Xcode 4.6.x, you may see a build error: No architectures to compile for (ARCHS=i386, VALID_ARCHS=armv7,armv7s). You can resolve this Xcode 4.6.x issue by manually editing "Valid Architectures" under Targets, to add i386.
- Select the Deployment
tab and set the iOS Deployment Target as appropriate for the device version
where you will deploy. The minimum version is iOS
6.0. Earlier SDKs and deployment targets are not
supported.
- Connect to the Microsoft Windows machine where OData SDK is
installed:
- From the Apple Finder menu, select Go > Connect to Server.
- Enter the machine name where the SDK is installed or IP
address of the server, for example, smb://<machine DNS
name> or smb://<IP
Address>. You see the shared directory.
- Navigate to the <SMP_HOME>\MobileSDK3\NativeSDK\ODataFramework\iOS\
directory in the SAP Mobile Platform installation
directory, and copy the includes and
libraries folders to the <ProjectName>/<ProjectName>
directory on your Mac.If you use AfariaSLL.a to provision configuration data and certificates for your SAP Mobile Platform client application, ensure to remove libcrypto.a and libssl.a, as AfariaSLL internally has these two libraries.The installation directory also has some of the MAF libraries. When you compile the project directly, an error might be encountered, as these libraries are dependent on MAF Reuse libraries. To resolve the compilation error, remove the following Files/ libs from the locations: <SMP_HOME>\MobileSDK3\NativeSDK\ODataFramework\iOS\libraries\Debug and <SMP_HOME>\MobileSDK3\NativeSDK\ODataFramework\iOS\libraries\Release:
- libMAFFormatters.a
- libMAFUIHelper.a
- libMAFZipHelper.a
- libMAFLogonUING.a
- libMAFLogger.a
- libMAFLogonManagerNG.a
- Right-click the <ProjectName> folder
under the project, select Add Files to
"<ProjectName>", navigate to the
<ProjectName/ProjectName>/libraries/Debug-universal
directory, select all the libraries, unselect Copy items into
destination group's folder (if needed), and click
Add.
The libraries are added to the project in the Project Navigator.
- Click the project root and then, in the middle pane, click the
<ProjectName> project and
update project configuration settings.
- In the right pane click the Build Settings tab, then scroll down to the Search Paths section.
- Enter the location of your
includes folder
("$SRCROOT/<ProjectName>/
includes/public/**") in the Header Search
Paths field.$SRCROOT is a macro that expands to the directory where the Xcode project file resides.
- Set the Other Linker Flags to -ObjC -all_load for both the release and for the debug configuration. It is important that the casing of -ObjC is correct (upper case 'O' and upper case 'C'). Objective-C only generates one symbol per class. You must force the linker to load the members of the class. You can do this with the help of the -ObjC flag. You must also force inclusion of all your objects from your static library by adding the linker flag -all_load.
- Add the following frameworks from the SDK to your project by
clicking on the active target, and selecting Build Phase
> Link Binary With Libraries. Click on the
+ button and select the following binaries from the
list:
- CoreFoundation.framework
- CoreData.framework
- Security.framework
- libicucore.A.dylib
- libstdc++.dylib
- libz.1.2.5.dylib
- CFNetwork.framework
- MobileCoreServices.framework
- SystemConfiguration.framework
- MessageUI.framework
- CFNetwork.framework
- To add the required bundle resources from the SDK to your project, click the active target, select Build Phase > Copy Bundle Resource. Click + > Add Other, and select the contents under <ProjectName/ProjectName>/includes/bundles folder.
- Select Product > Clean and then Product > Build to test the initial set up of the project. If you have correctly
followed this procedure, you should receive a Build
Succeeded message.To build a project using Automatic Reference Counting, under the Build Settings tab, set Automatic Reference Counting (ARC) to YES, if ARC option was un-checked while creating project.