Implement MAF Logon Code.
- Set required permissions in your Android manifest file. MAF Logon uses these
Android device functions:
- Network and Internet communication
- Phone state reading
- External storage
<uses-permission android:name="android.permission.INTERNET"/>
<uses-permission android:name="android.permission.READ_PHONE_STATE"/>
<uses-permission android:name="android.permission.ACCESS_NETWORK_STATE"/>
<uses-permission android:name="android.permission.WRITE_EXTERNAL_STORAGE" />
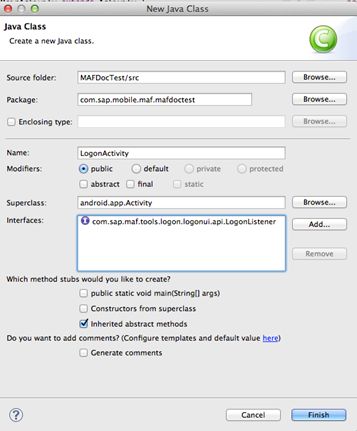
- Create LogonActivity. To present logon screens, create a new Android activity
and implement the LogonListener interface. Use the New Java Class wizard:
Select android.app.Activity as the superclass, and add com.sap.maf.tools.logon.lgoonui.api.LogonListener to the implemented interfaces. - Click Finish to create the activity, and stub methods, for the LogonListener. The MAF Logon component calls back these methods on various events.
- Add the activity to your project’s AndroidManifest.xml:
 <activity android:name="com.sap.mobile.maf.mafdoctest.LogonActivity"
android:configChanges="keyboardHidden|orientation|screenSize">
</activity>
- Add these fields to the
class:
private final String LOG_TAG = "MAFLogon";
private final String APPLICATIONID = "com.sap.maf.test.adr.logonapp";
private LogonUIFacade logonUIFacade;
private Activity act;
private Context ctx;
To automatically resolve all the necessary imports needed for the fields, click the Source menu, and select Organize Imports. - Override the onCreate methods of the superclass with this
implementation:
@Override protected void onCreate(Bundle savedInstanceState) { super.onCreate(savedInstanceState); //get an instance of the LogonUIFacade logonUIFacade = LogonUIFacade.getInstance(); //set activity reference act = this; //set context reference ctx = this; //init LogonUIFacede logonUIFacade.init(this, ctx, APPLICATIONID); //ask LogonUIFacede to present the logon screen //set the resulting view as the content view for this activity setContentView(logonUIFacade.logon()); } - In the MainActivity.java file, send an Intent to present
the
LogonActivity:
@Override protected void onCreate(Bundle savedInstanceState) { super.onCreate(savedInstanceState); setContentView(R.layout.activity_main); //present MAF Logon Screen Intent i = new Intent(this, LogonActivity.class); startActivity(i); } - In the LogonActivity.java file, implement the
onLogonFinished method from the
LogonListener:
@Override public void onLogonFinished(String arg0, boolean arg1, LogonContext arg2) { //hides MAFLogonUI when logon finished and returns to main activity finish(); } - Run your application in Android emulator. Now you can present the MAFLogonUI and register successfully.