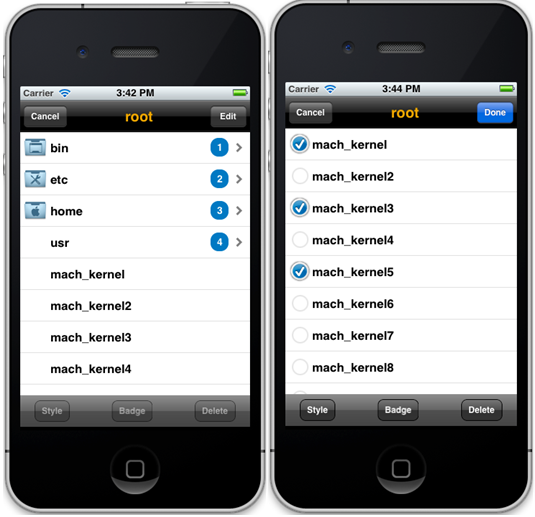
The editing mode displays hierarchical data in the same way as the browsing mode, but also lets device users select multiple leaf items and simultaneously execute actions on all of them. The custom actions are always visible at the bottom of the browsing UI, and can be activated by tapping the Edit button in the top-right corner.
Browsing mode versus editing mode:
Initializing and Creating the Editing Mode
To create an editing mode, use the mafCreateTreeController C factory function, which has six parameters in its signature and is declared in the MAFTreeControllerFactory header file. This is similar to creating a tree view for browsing mode, except you must specify two additional parameters: one for providing an array of actions, and the other for defining a handler delegate for those actions.
- (IBAction) showTreeViewWithActions:(id)sender
{
    // create an "editable" tree view, that is a navigation controller
    MAFTreeController *editTreeView =
				mafCreateTreeControllerWithActions(
					[self createContent], // data to show
					[self createActions], // edit actions selections				      				   self, // single selection delegate
						          self, // “badge” value delegate
							   self, // edit actions delegate
				   CGRectMake(0, 0, 320, 367)
									);
    // set some transition for the view when showing up
    [editTreeView setModalTransitionStyle:UIModalTransitionStyleCrossDissolve];
    // present the navigation controller in a modal view
    [self presentModalViewController:editTreeView animated:YES];
	[editTreeView release];
}
// define and create actions
- (NSArray*) createActions
{
	MAFTreeViewAction* action1 = [[[MAFTreeViewAction alloc]
						    initWithActionID:@"action1"
   							   andLabel:@"Style"] autorelease];
	MAFTreeViewAction* action2 = [[[MAFTreeViewAction alloc]
						    initWithActionID:@"action2"
							   andLabel:@"Badge"] autorelease];
    MAFTreeViewAction* action3 = [[[MAFTreeViewAction alloc]
						    initWithActionID:@"action3"
							   andLabel:@"Delete"] autorelease];
return [NSArray arrayWithObjects:action1, action2, action3, nil];

}
Interaction
To perform an action on the selected elements, define and register a MAFTreeViewCellDelegate instance for the MAFTreeController. Provide an instance of the delegate in the constructor C function, and implement the delegate’s didSelectAction method.
 // MAFTreeViewActionDelegate
- (void) treeViewController:(MAFTreeViewController*)controller didSelectAction:(MAFTreeViewAction*)action forItems:(NSArray*)items
{
NSString* message = [NSString stringWithFormat:@"'%@' called on %d items", action.actionLabel, items.count];
    UIAlertView* uia = [[[UIAlertView alloc] initWithTitle:@"Action initiated"
                                                   message:message
                                                  delegate:self
                                         cancelButtonTitle:@"Ok"
                                         otherButtonTitles:nil] autorelease];
    [uia show];
	if (action.actionID == @"action1") {
        // Execute action1 on selected leaf elements here
		 // ...
	} else if (action.actionID == @"action2") {
        // Execute action2 on selected leaf elements here
   		 // ...
    } else if (action.actionID == @"action3") {
        // Execute action3 on selected leaf elements here
		 // ...
	}
}
The
delegate method receives the specific action, as well as the tree view instance on
which the action is being executed. You can execute logic based on the specific
action received.