Adding the Logon Plugin

To install the Logon plugin, use the Cordova command line interface.

Prerequisites
Task
  1. Add the plugin, by entering, at the command prompt:

    On Windows:

    cordova -d plugin add <SDK_HOME>\MobileSDK3\KapselSDK\plugins\logon

    On Mac:

    cordova -d plugin add ~<SDK_HOME>/MobileSDK3/KapselSDK/plugins/logon

    Note: The path you enter to the Kapsel plugin must be the absolute path (not relative path).
  2. (Optional) To see a list of installed plugins in your Cordova project, open a command prompt or terminal window, navigate to your Cordova project folder, and enter:
    cordova plugins
    The Cordova command line interface returns a JSON array showing installed plugins, for example:
    [ 'com.sap.mp.cordova.plugins.corelibs',    
    'com.sap.mp.cordova.plugins.logon',    
    'org.apache.cordova.console',    
    'org.apache.cordova.device',
    'org.apache.cordova.device-orientation',    
    'org.apache.cordova.dialogs',    
    'org.apache.cordova.inappbrowser' ] 

    In this case, some core Cordova plugins were added, including corelibs, console, device, device-orientation, dialogs, and inAppBrowser. CoreLibs is a utility plugin that is automatically added to every Kapsel project by the command line interface, so you need never add the CoreLibs plugin to a project manually.

  3. Configure the application in Management Cockpit.
  4. Define a variable in the JavaScript code (typically, this is done in the index.html file of your Cordova application) to describe the app ID, for example:
    var appId = "com.sap.kapsel.mykapselapp";
    Kapsel uses an app ID to tell the server which application definition on the server to use for this application. The app ID that is defined on the server must match what is entered here.
  5. Define the connection to the server, for example:
    var defaultContext = {    
         "serverHost" : "192.168.254.159",    
         "https" : "false",    
         "serverPort" : "8080",  
    }; 
    This prepopulates the fields in the registration dialog that is shown to users during the initialization process.
  6. Make a call to the Logon plugin’s init method as shown:
    //Make call to Logon's Init method to get things registered and all set up  
    sap.Logon.init(logonSuccess, logonError, appId, defaultContext); 
    The init method gathers information about the environment’s security configuration by asking the Afaria client and Client Hub application, if available, sets up and configures the DataVault, connects to the server to register the application connection and authenticate the user. As part of this process, the appropriate screens are shown to gather user input and manage the entire process.
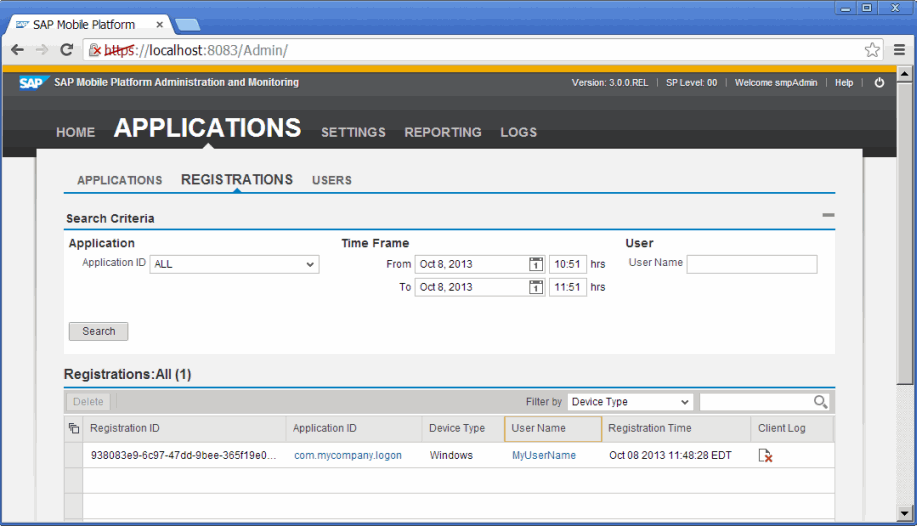
  7. Verify the registration in Management Cockpit.
    1. Log in to Management Cockpit.
    2. Click Applications.
    3. Click Registrations.
      You can see the registration ID following a successful registration.

      verify_register_logon
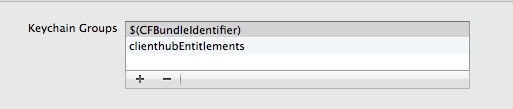
  8. Use the Android IDE or Xcode to deploy and run the project.
    Note: If you are deploying to an iOS device, in Xcode, you must add the clienthubEntitlements and $(CFBundleIdentifier) to the keychain group in the Entitlements section as well as the bundle identifier.

    CFBundleIdentifier
Related tasks
Adding the AppUpdate Plugin
Adding the AuthProxy Plugin
Adding the Logger Plugin
Adding the Push Notification Plugin
Adding the EncryptedStorage Plugin
Adding the Settings Plugin
Creating an Apache Cordova Project
Configuring the Application in the Management Cockpit
Related reference
Setting Up the Development Environment