Configuring the Build Settings

Configure the build settings for the Xcode project, then build the project.

  1. In the Project Navigator, under Project, select
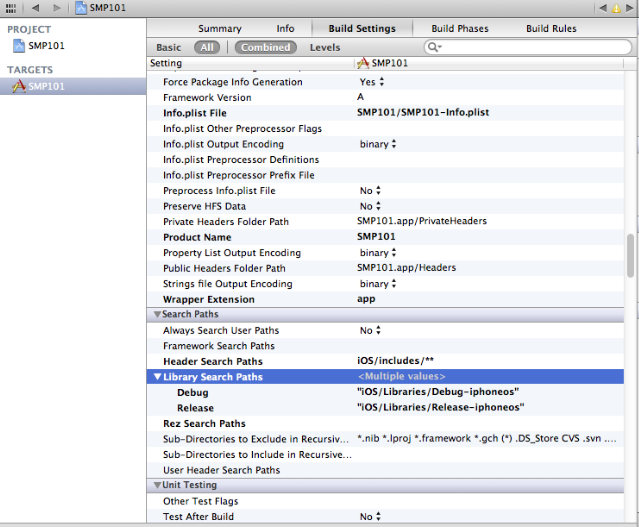
 SMP101 > Build Settings and scroll down to the Search Paths section. Enter the location of the iPhone simulator libraries in the Header Search Paths and Library Search Paths fields.
    $SRCROOT is a macro that expands to the directory where the Xcode project file resides. Adding this macro in front of the path is optional.
    • In Header Search Paths, enter the path to the iOS/includes directory, then select the recursive option. In this example, the path is indicated as iOS/includes/**.
    • In Library Search Paths, specify profiles for Debug and Release. In this example, the path is indicated as "iOS/Libraries/$(CONFIGURATION)$(EFFECTIVE_PLATFORM_NAME)". Escape the path names using double quotes.

    Project Build Settings
  2. In the Project Navigator, under Target, select SMP101 > Build Phases, then expand the Link Binary with Libraries section.
    Click the + icon below the list, select the following libraries, and then click Add to add them to the project:
    • CFNetwork.framework
    • CoreFoundation.framework
    • libicucore.A.dylib
    • libstdc++.dylib
    • libz.dylib
    • MobileCoreServices.framework
    • Security.framework
    • SystemConfiguration.framework
  3. In the Project Navigator, under Target, select SMP101 > Build Phases, then expand the Copy Bundle Resources section. Select SMP101-info.plist and click on the - sign to remove it.
  4. Select Product > Clean , then Product > Build to test initial project setup. If you correctly followed this procedure, you see a Build Succeeded message.