Add a join to the sample project. A join combines events from two or more inputs to create a single stream or window. It is similar to a join in SQL.
Event Stream Processor supports inner joins, left and right outer joins, and full outer joins, with join syntax comparable to SQL ANSI join syntax and comma-separated syntax. For more information about joins, see the Studio Users Guide or the Programmers Guide.
- Click Copy Columns (
) in the join shape toolbar and select columns to copy.
Tip: If you get an error, or do not see all columns from both inputs listed, try reconnecting the new Join element to the Positions or VWAP shapes as needed.For this example, choose Select All, then clear the check box on VWAP.Symbol so that you don't get the symbol field twice. - Click Add Column Expressions (
).
For this example add two columns: CurrentPosition and AveragePosition. - In the Join Conditions compartment of the join shape, set up
the join conditions.If you connected the join to the VWAP and Positions inputs, in that order, there are now two elements in the Join Conditions compartment. The first defines the leftmost element for the join. If you connected to VWAP first, the first element (left side of the join) is VWAP. For this example, you must configure the second join element.
- Double-click the second join element to open the Edit Join Expression dialog.
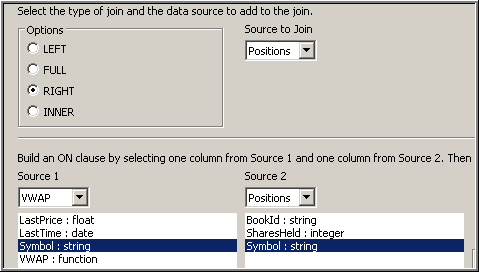
- Choose a join type.For this example, use RIGHT, which is a right outer join. You want RIGHT because VWAP is the first, or left input, and Positions is the second, or right input. You only want your positions in the output; you do not need prices for symbols that are not held in the portfolio.
- Select the columns to join on.You cannot edit join constraints manually in the Visual editor.For this example:.
- As Source 1, ensure that VWAP is in the dropdown, and select Symbol:string as the column.
- As Source 2, ensure that Positions is in the dropdown, and select Symbol:string as the column.
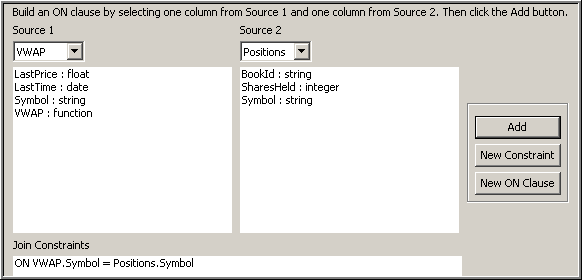
- Click Add.The columns chosen appear in Join Constraints, where you should now see:
ON VWAP.Symbol=Positions.Symbol
The dialog shows:
- Click OK.
- In the join shape, click
(Toggle Type to OUTPUT).
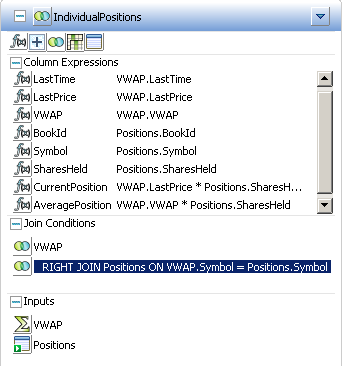
The IndividualPositions join shape now shows the completed join, as shown in the
figure.