Deploying and Running the Device Application

Deploy the device application to a Windows Mobile 6 device emulator, and test its functionality.

  1. In Visual Studio, choose Tools > Device Emulator Manager.
  2. Scroll down to Windows Mobile 6 Professional Emulator right-click, and select Connect.
  3. In Device Emulator Manager, right-click Windows Mobile 6 Professional Emulator again and select Cradle.
  4. In the Solution Explorer of Visual Studio, right-click the SUP010 project and select Deploy.
  5. If the Deploy SUP101 dialog displays, select Windows Mobile 6 Professional Emulator and click Deploy.
  6. Then in the Windows Mobile emulator go to Start > Programs > File Explorer.
  7. Navigate to the installed path by accessing My Device > Program Files > sup101.
  8. Click SUP101 to start the application.
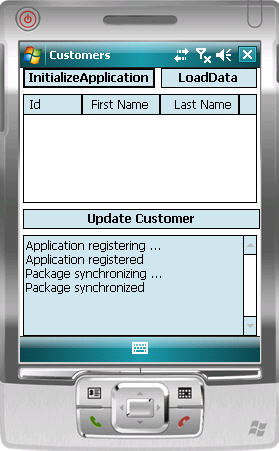
  9. Click InitializeApplication.
    Inside InitializeApplication, the application is registering and synchronizing data from the back end server. The initialization process also enables Target Change Notification by:
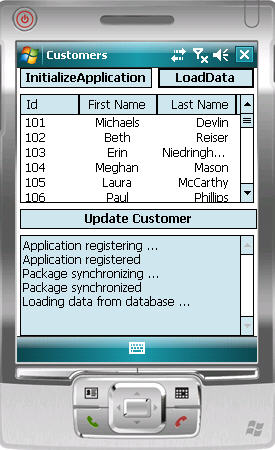
    ISynchronizationGroup sg = SUP101DB.GetSynchronizationGroup("default");
    sg.EnableSIS = true;
    sg.Save();
    
    A message displays in the output box below when complete.
    Customer List Screen
  10. Click LoadData to populate Customer data in the list view.
    To improve performance, SUP101DB.ExecuteQuery is used to query customer list, selecting only required columns (fname, lname...) instead of the entire customer object.
    Customer List Refresh
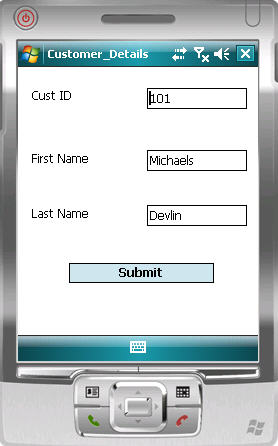
  11. Highlight a customer record and click Update Customer.

    Customer List Update
  12. Make changes, then click Submit to return to the Customers List screen.
    Inside Submit, customer info is updated and SUP101DB.beginSynchronize is called in the background to avoid blocking the user interface.