Creating the Customer Details Form

Create the user interface for the Customer_Details form.

  1. Add another Windows Form to the project, and name this one Customer_Details.
  2. From the Toolbox, drag and drop three labels onto the Customer_Details form.
  3. Align the labels on the left side of the form.
    In the Properties view, in the Text field, rename the labels Cust ID, First Name, and Last Name.
  4. From the Toolbox, drag and drop three text boxes onto the Customer_Details form and align them to the right of each of the three labels.
  5. From the Toolbox, drag and drop one button from Common Device Controls onto the Customer_Details form below the labels and text boxes.
  6. In the Properties view, in the Text field, rename the button to Submit.
  7. Save the Customer_Details.cs form.
  8. In Solution Explorer, in the SUP101 project, right-click Customer_Details.cs, then select View Code.
  9. Replace the existing code with the code from the Customer_Details.cs file you downloaded from the Sybase SyBooks Online Infocenter site:
    using System;
    
    using System.Collections.Generic;
    using System.ComponentModel;
    using System.Data;
    using System.Drawing;
    using System.Text;
    using System.Windows.Forms;
    
    using SUP101;
    using Sybase.Collections;
    using Sybase.Persistence;
    
    namespace SUP101
    {
        public partial class Customer_Details : Form
        {
            Customer thisCustomer;
            public Customer_Details()
            {
                InitializeComponent();
            }
    
            private void submit_Click(object sender, EventArgs e)
            {
                thisCustomer.Fname = textBox2.Text;
                thisCustomer.Lname = textBox3.Text;
                thisCustomer.Save();
                thisCustomer.SubmitPending();
    
                ISynchronizationGroup sg = SUP101DB.GetSynchronizationGroup("default");
                GenericList<ISynchronizationGroup> syncGroups = new GenericList<ISynchronizationGroup>();
                syncGroups.Add(sg);
                SUP101DB.BeginSynchronize(syncGroups, "");
    
                Program.getForm1().Visible = true;
                Program.getForm1().RefreshListItem(thisCustomer.SurrogateKey);
                Program.getForm2().Visible = false;
            }
            private void AddDataToForm()
            {
                textBox1.Text = Program.getCustomer();
                int id = Int32.Parse(Program.getCustomer());
                thisCustomer = Customer.FindByPrimaryKey(id);
                textBox2.Text = thisCustomer.Fname;
                textBox3.Text = thisCustomer.Lname;
            }
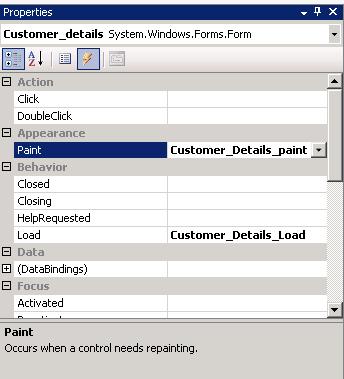
            private void Customer_Details_Load(object sender, EventArgs e)
            {
                AddDataToForm();
            }
            private void Customer_Details_paint(object sender, PaintEventArgs e)
            {
                AddDataToForm();
            }
        }
    }
  10. In the Customer_Details.cs[Design] view, click the Submit button, then in the Properties view, click the Event icon (lightning bolt), add the submit_Click event to the Submit button.
  11. Add events to the Customer_Details.cs.
    1. Click the Customer_Details.cs [Design] tab.
    2. In Properties view, select Customer_Details System.Windows.Forms.Form. from the drop-down list at the top of the view.
    3. Click the Events icon (lightning bolt).
    4. In Load, add the Customer_Details_Load event.
    5. In Paint, add the Customer_Details_paint event.

    Customer Details Event Properties
  12. Save your changes.