using System;
using System.Collections.Generic;
using System.ComponentModel;
using System.Data;
using System.Drawing;
using System.Text;
using System.Windows.Forms;
using SUP101;
namespace SampleApp
{
public delegate void DelegateAddString(String s);
public partial class Customers : Form
{
DelegateAddString m_DelegateAddString;
public Customers()
{
InitializeComponent();
m_DelegateAddString = new DelegateAddString(this.AddString);
}
private void AddString(String s)
{
textBox1.Text += s + "\r\n";
textBox1.SelectionStart = textBox1.Text.Length;
textBox1.ScrollToCaret();
textBox1.Refresh();
}
private void Subscribe_Click(object sender, EventArgs e)
{
//This checkes to see if the database exists, then deletes it if it does.
if (SUP101DB.DatabaseExists())
{
SUP101DB.DeleteDatabase();
AddString("Database deleted");
}
else
{
//This creates the database.
SUP101DB.CreateDatabase();
}
//To receive callbacks, you must register a CallBackHandler
//with the generated database class, the entity class, or both. This
//code creates and registers a handler to receive callbacks.
MyCallbackHandler callback = new MyCallbackHandler();
MyCallbackHandler.textBox1 = textBox1;
SUP101DB.RegisterCallbackHandler(callback);
//This operation starts background synchronization for the database class.
SUP101DB.StartBackgroundSynchronization();
AddString("Background synchronization started");
try
{
//This calls SUP101, the package database, user name and password to connect to the Unwired Server.
SUP101DB.LoginToSync("supAdmin", "s3pAdmin");
}
catch (Exception ex)
{
List<LogRecordImpl> lrs = LogRecordImpl.FindWithQuery(new Sybase.Persistence.Query());
AddString("log record count=" + lrs.Count);
for (int i = 0; i < lrs.Count; i++)
{
AddString(lrs[i].Message);
}
}
//For message-based replication, before you can synchronize MBO changes with the server, you must subscribe to the
//mobile application package deployed on the server by calling SampleAppDB.subscribe(). This also downloads certain data
//to devices for those that have default values. otify the server of your subscription to a specific package.
//If you are not subscribed to the SUP101 package,a message will tell you to subscribe first.
SUP101DB.Subscribe();
AddString("Subscribe request sent");
AddListView();
}
private void refresh_Click(object sender, EventArgs e)
{
if (SUP101DB.IsSubscribed())
{
Cursor.Current = Cursors.WaitCursor;
AddString("Refresh data");
AddDataToListView();
Cursor.Current = Cursors.Default;
}
else
{
AddString("Please Subscribe first");
}
}
private void AddListView()
{
this.listView1.Clear();
listView1.Columns.Add("Id", listView1.Width / 4, HorizontalAlignment.Left);
listView1.Columns.Add("First Name", listView1.Width / 3, HorizontalAlignment.Center);
listView1.Columns.Add("Last Name", listView1.Width / 3, HorizontalAlignment.Right);
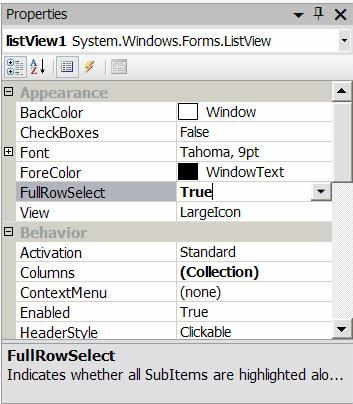
listView1.View = View.Details;
listView1.FullRowSelect = true;
}
private void AddDataToListView()
{
this.listView1.Clear();
listView1.Columns.Add("Id", listView1.Width / 4, HorizontalAlignment.Left);
listView1.Columns.Add("First Name", listView1.Width / 3, HorizontalAlignment.Center);
listView1.Columns.Add("Last Name", listView1.Width / 3, HorizontalAlignment.Right);
listView1.View = View.Details;
listView1.FullRowSelect = true;
List<Customer> c = Customer.FindAll();
if (c.Count > 0)
{
for (int i = 0; i < c.Count; i++)
{
ListViewItem item = new ListViewItem(c[i].Id.ToString());
item.SubItems.Add(c[i].Fname);
item.SubItems.Add(c[i].Lname);
listView1.Items.Add(item);
}
}
}
private void update_Click(object sender, EventArgs e)
{
if (listView1.FocusedItem != null)
{
Program.setCustomer(listView1.FocusedItem.Text);
Program.getForm2().Visible = true;
Program.getForm1().Visible = false;
}
else
MessageBox.Show("Please select a row");
}
private void Send_Click(object sender, EventArgs e)
{
Customer.SubmitPendingOperations();
}
public class MyCallbackHandler : Sybase.Persistence.DefaultCallbackHandler
{
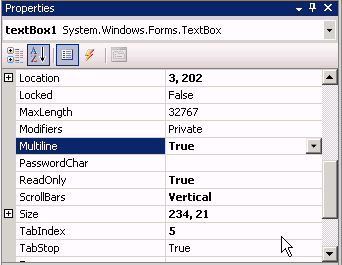
public static TextBox textBox1 = new TextBox();
private void invokeDelegate(string s)
{
Customers f = Program.getForm1();
f.Invoke(f.m_DelegateAddString, new Object[] { s });
}
// Called when login fails.
public override void OnLoginFailure()
{
invokeDelegate("Login failed");
}
//Called when a replay request succeeds.
public override void OnReplaySuccess(object o)
{
invokeDelegate("Operation replay successful");
}
//Called when a replay request fails.
public override void OnReplayFailure(object o)
{
invokeDelegate("Operation Replay failed");
}
//Called when the last import message is successfully processed regarding the subscribe request.
public override void OnImportSuccess()
{
invokeDelegate("Import successful");
}
}
}
}