Deploy the Mobile Workflow package to an iPhone simulator for testing.
Prerequisites
- You must have a registered device user in Sybase Control Center to which to assign the mobile workflow. See the Sybase Control Center online help topic Configure > Configuring Unwired Platform > Device Users > Devices > Messaging Devices.
- You must have a Mac with iPhone SDK 4.0.x installed.
- Xcode 3.2.3 or higher.
- Generate the Mobile Workflow package.
Task
The Workflow Container referenced in this procedure is a sample container. You can use Xcode to build your own customized user interface and configure other resources.
- Log into Sybase Control Center and assign the mobile workflow package to registered device users.
See the Sybase Control Center online help topic Configure > Configuring Unwired Platform > Mobile Workflows > Configuring a Mobile Workflow Package.
- Copy these directories from your Sybase Unwired Platform installation %Sybase%\UnwiredPlatform\Servers\UnwiredServer\ClientAPI\ObjectiveC to a location on your Mac:
- includes
- libs
- libs.iPad
- images
- strings
- WorkflowContainer
You can copy these files into whatever location you choose, but they should all be at the same directory level.
- In the WorkflowContainer folder, unzip WorkflowContainer-iPhone.zip into the same directory level in which you copied the other folders.
This creates a SUPWorkflows folder.
- In the images folder, unzip the WorkflowImages.zip file in its current location.
It unzips as a workflowimages folder.
- In the SUPWorkflowContainer folder, double-click SUPWorkFlows.xcodeproj so that it opens in the XCode IDE.
- (Optional) If you are building a project for the iPad simulator, go into the Target settings for the project, and change the Library Search Paths to replace libs with libs.iPad.
- In XCode, select .
The project builds and the simulator starts.
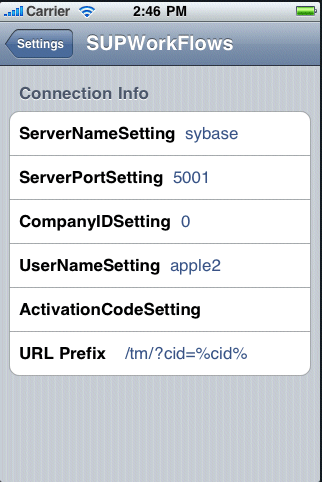
- In the Settings for the simulator, choose SUPWorkflows and verify the connection settings.
The ServerNameSetting should be the name of the machine on which the Mobile Workflow package is deployed to Unwired Server.
- In the applications screen, open the SUPWorkFlows applications.
The deployed Mobile Workflow package is shown in the SUPWorkFlows menu.