Import the generated MBO code and associated libraries into the iOS development environment.
- Start Xcode 4.3 and select Create a new Xcode project.
- Select iOS Application and Window-based Application as the project template, and then click Next.
- Enter <ProjectName> as the
Product Name, MyCorp as the
Company Identifier, select
Universal as the Device Family
product, and then click Next.Note: If you will deploy more than one Xcode project with the same application name, the applications will overwrite each other on the device. Ensure that projects do not share the same name even though they have different application IDs.
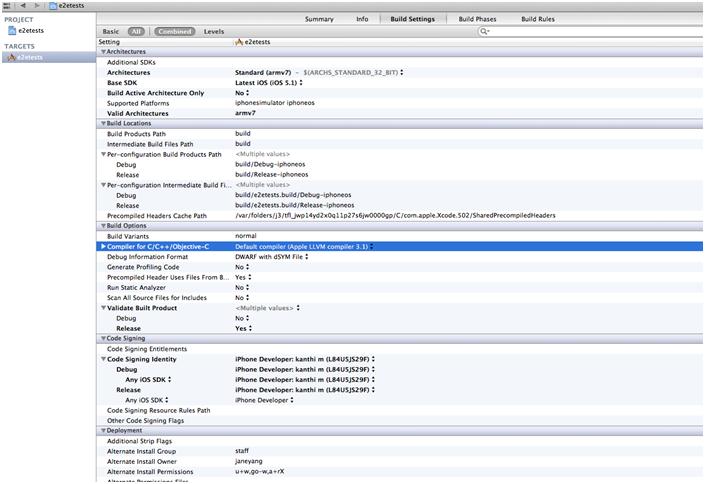
- Select the Architectures tab, and set
Base SDK for All Configurations to iOS
5.1.
- Select the Deployment tab and set the iOS Deployment Target to iOS 4.3 or later. Earlier SDKs and deployment targets are not supported.
- Select the Valid Architectures as Standard (armv7), Supported Platforms as iphonesimulator iphoneos, and the Targeted device family as iPhone/iPad. This ensures that the build of the application can run on either iPhone or iPad.
- Select a location to save the project and click
Create to open it.
Xcode creates a folder,<ProjectName>, to contain the project file, <ProjectName>.xcodeproj and another <ProjectName> folder, which contains a number of automatically generated files.
Copy the files from your Windows machine in to the <ProjectName> folder that Xcode created to contain the generated source code.
- Connect to the Microsoft Windows machine where Sybase Unwired
Platform is installed:
- From the Apple Finder menu, select Go > Connect to Server.
- Enter the name or IP address of the machine, for
example, smb://<machine DNS name> or
smb://<IP Address>. You see the shared directory.
- Navigate to the \UnwiredPlatform\MobileSDK213\ObjectAPI\DOE\iOS directory in the Unwired Platform installation directory, and copy the includes and Libraries folders to the <ProjectName>/<ProjectName> directory on your Mac.
- Navigate to the output directory that you specified when you generated objective-C code, and copy that folder to the <ProjectName>/<ProjectName> directory on your Mac.
- In the Xcode Project Navigator, right-click the <ProjectName> folder under the project,
select Add Files to
"<ProjectName>", select the output folder with the
generated Objective-C code that you just copied, unselect Copy items into destination group's folder (if
needed), and click Add.
The output folder is added to the project in the Project Navigator.
- Right-click the <ProjectName> folder under the project, select Add Files to "<ProjectName>", navigate to
the <ProjectName/ProjectName>/Libraries/Debug-iphonesimulator
directory, select the libclientrt.a,
libSUPObj.a, libMO.a, libsupcore.a, libsupSqlite.a, libAfariaSLL.a and
libDatavault.a libraries, unselect
Copy items into destination group's folder (if
needed), and click Add.
The libraries are added to the project in the Project Navigator.
Note: The library version corresponds to the configuration you are building. For example, if you are building for a debug version of the simulator, navigate to libs/Debug-iphonesimulator/ to add the libraries. - Right-click the project root, select New Group, and then rename it to Resources.
- Right-click the Resources folder, select
Add Files to "<ProjectName>", navigate to the
includes directory, select the
Settings.bundle file, unselect Copy items
into destination group's folder (if needed), and click
Add. The bundle Settings.bundle is added to the project in the Project Navigator.
This bundle adds resources that lets iOS device client users input information such as server name, server port, user name and activation code in the Settings application.
- Click the project root, in the middle pane click the <ProjectName> project, and set Automatic Reference Counting (ARC) to NO.
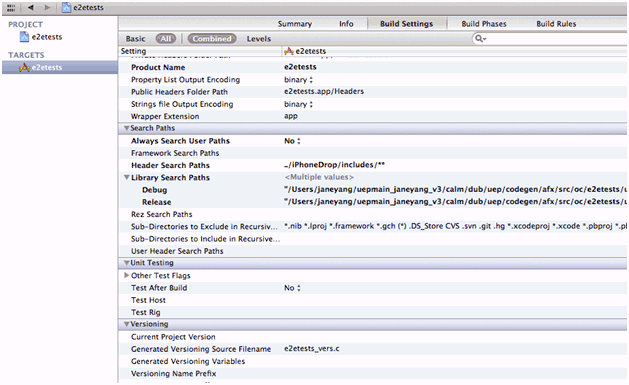
- Click on the active target and modify the Library Search Path
from the Building Settings. For
example:
$(SRCROOT)/../iOS/Libraries/$(CONFIGURATION)$(EFFECTIVE_PLATFORM_NAME)
Enter the path to the location where you copied the libraries. Specify separate profiles for debug and release, and specify "any iOS" and "any iOS simulator." Ensure that you escape the paths using double quotes.
- Click on the active target, and modify the Header Search Path
from Building Settings. Specify the path to the location where you copied the include files, and select the Recursive checkbox. The header files in the client library are grouped into subdirectories public and internal, so the recursive option is required.
- Add the following frameworks from the SDK to your project by
clicking on the active target, and selecting Build Phase
> Link Binary With Libraries. Click on the
+ button and select the following binaries from the
list:
- AddressBook.framework
- CoreFoundation.framework
- QuartzCore.framework
- Security.framework
- CFNetwork.framework
- SystemConfiguration.framework
- MobileCoreServices.framework
- libicucore.A.dylib
- libstdc++.dylib
- libz.dylib
- Hold the Option key, and select Product > Clean Build Folder and then Product > Build to test the initial set up of the project. If you have correctly followed this procedure, then you should receive a Build Succeeded message.
- In the Info.plist file,
set the "Application does not run in background" setting to YES.Note: If you want to allow your application to continue to run safely in the background, do not perform this step. See Developer Guide: iOS Object API Applications > Development Task Flow for DOE-based Object API Applications > Creating a Project > Importing Libraries and Code for Applications Enabled with ARC.
- Write your application code to reference the generated MBO code. See the Developer Guide: iOS Object API Applications for information about referencing the iOS Client Object API.