Importing Libraries and Code in the Xcode IDE

Import the generated MBO code and associated libraries into the iOS development environment.

Note: For more information on Xcode, refer to the Apple Developer Connection: http://developer.apple.com/tools/Xcode/.
  1. Start Xcode and select Create a new Xcode project.
  2. Select iOS Application and Window-based Application as the project template, and then click Next.
  3. Enter <ProjectName> as the Product Name, MyCorp as the Company Identifier, select Universal as the Device Family product, and then click Next.
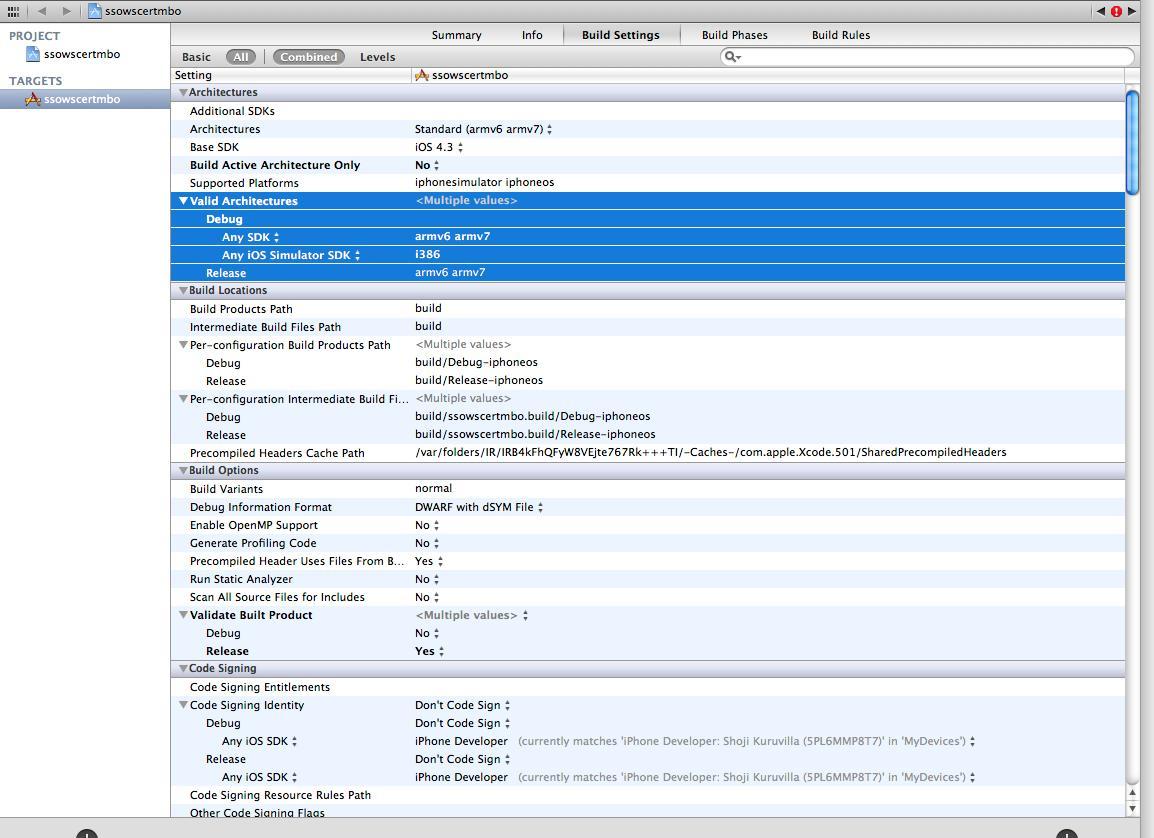
  4. Select the Architectures tab, and set Base SDK for All Configurations to iOS 4.3.

    Xcode Base SDK
  5. Select the Deployment tab and set the iOS Deployment Target to iOS 4.3 or iOS 4.2, as appropriate for the device version where you will deploy. Earlier SDKs and deployment targets are not supported.
  6. Select the Valid architecture as armv6 armv7 and the Targeted device family as iPhone/iPad. This ensures that the build of the application can run on either iPhone or iPad.
    Note: When you migrate an existing project from an older version of Xcode to Xcode 4, you may see a build error: No architectures to compile for (ARCHS=i386, VALID_ARCHS=armv6,armv7). You can resolve this Xcode 4 issue by manually editing "Valid Architectures" under Targets, to add i386.

    Xcode valid architectures
  7. Select a location to save the project and click Create to open it.

    Xcode creates a folder,<ProjectName>, to contain the project file, <ProjectName>.xcodeproj and another <ProjectName> folder, which contains a number of automatically generated files.

    Copy the files from your Windows machine in to the <ProjectName> folder that Xcode created to contain the generated source code.

  8. Connect to the Microsoft Windows machine where Sybase Unwired Platform is installed:
    1. From the Apple Finder menu, select Go > Connect to Server.
    2. Enter the name or IP address of the machine, for example, smb://<machine DNS name> or smb://<IP Address>.
      You see the shared directory.
  9. Navigate to the \UnwiredPlatform\ClientAPI\MBS\ObjectiveC directory in the Unwired Platform installation directory, and copy the includes and libs folders to the <ProjectName>/<ProjectName> directory on your Mac.
  10. Navigate to the mobile application project (for example, C:\Documents and Settings\administrator\workspace\<ProjectName>), and copy the Generated Code folder to the <ProjectName>/<ProjectName> directory on your Mac.
  11. In the Xcode Project Navigator, right-click the <ProjectName> folder under the project, select Add Files to "<ProjectName>", select the Generated Code folder, unselect Copy items into destination group's folder (if needed), and click Add.
    The Generated Code folder is added to the project in the Project Navigator.
  12. Right-click the <ProjectName> folder under the project, select Add Files to "<ProjectName>", navigate to the <ProjectName/ProjectName>/libs/Debug-iphonesimulator directory, select the libclientrt.a, libSUPObj.a, and libMO.a libraries, unselect Copy items into destination group's folder (if needed), and click Add.

    The libraries are added to the project in the Project Navigator.

    Note: The library version corresponds to the configuration you are building. For example, if you are building for a debug version of the simulator, navigate to libs/Debug-iphonesimulator/ to add the libraries.
  13. Right-click the project root, select New Group, and then rename it to Resources.
  14. Right-click the Resources folder, select Add Files to "<ProjectName>", navigate to the includes directory, select the Settings.bundle file, unselect Copy items into destination group's folder (if needed), and click Add.
    The bundle Settings.bundle is added to the project in the Project Navigator.

    This bundle adds resources that lets iOS device client users input information such as server name, server port, user name and activation code in the Settings application.

  15. Click the project root and then, in the middle pane, click the <ProjectName> project.
    1. In the right pane click the Build Settings tab, then scroll down to the Search Paths section.
    2. Enter the location of your includes folder ("$SRCROOT/<ProjectName>/includes/**") in the Header Search Paths field.
      $SRCROOT is a macro that expands to the directory where the Xcode project file resides.
  16. Add the following frameworks from the SDK to your project by clicking on the active target, and selecting Build Phase > Link Binary With Libraries. Click on the + button and select the following binaries from the list:
    • AddressBook.framework
    • CoreFoundation.framework
    • QuartzCore.framework
    • Security.framework
    • libicucore.A.dylib
    • libstdc++.6.dylib
    • libz.1.2.3.dylib
  17. In the Build Settings, modify the library search path to remove the stdc path from the list of search paths.
  18. Select Product > Clean and then Product > Build to test the initial set up of the project. If you have correctly followed this procedure, then you should receive a Build Succeeded message.
  19. Write your application code to reference the generated MBO code. See the Developer Guide for iOS for information about referencing the iOS Client Object API.
Related concepts
Using Object API to Develop a Device Application
Related tasks
Task Flow for Xcode IDE Development
Related reference
Developing Applications in the Xcode IDE