Importing Libraries and Code into the Xcode IDE

Import the generated MBO code and associated libraries into the iOS development environment.

Note: For more information on Xcode, refer to the Apple Developer Connection: http://developer.apple.com/tools/Xcode/.
  1. In the Xcode IDE, create a new Xcode project.
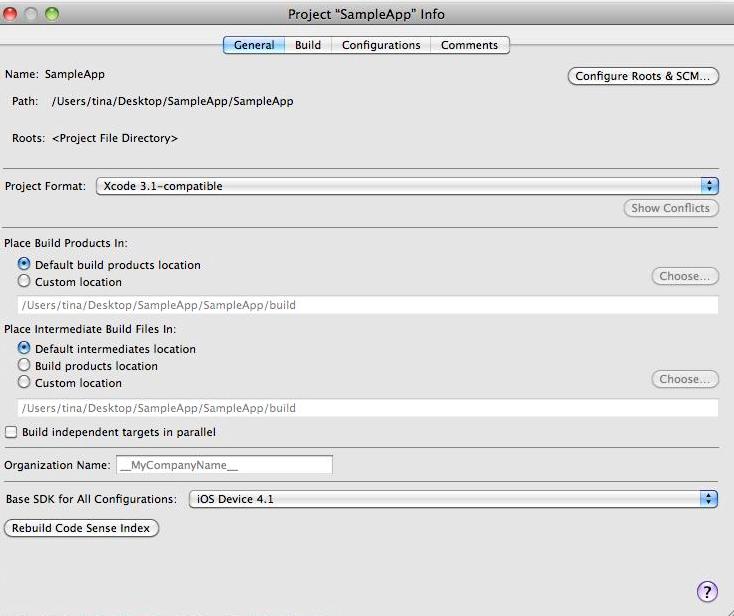
  2. In the project settings, set the base SDK configuration for an iPhone simulator or device to iOS Device 4.1. If your code needs to run on a device with an earlier version of the OS (3.2 for iPad, or 3.1.3 for iPhone), this can be changed by setting the “iPhone OS Deployment Target”.

    Project Info Xcode iOS 4.1
  3. Copy the generated code from your Microsoft Windows environment to a location on your Mac (for example, your Home directory).
  4. Copy over the include files from <unwired server install>\ClientAPI\ObjectiveC\includes and the libraries from <unwired server install>\ClientAPI\ObjectiveC\libs to a directory on your Mac (for example, your Home directory). There are two library directories: the libs directory (for iPhone), and the libs.iPad directory (for iPad). If building for iPad simulator or device, you must use the libraries in libs.iPad.
    1. After copying the directories into a local directory on your Mac, open Finder and locate the <unwired server install>\ClientAPI\ObjectiveC\includes folder.
    2. Drag the <unwired server install>\ClientAPI\ObjectiveC\includes\internal and <unwired server install>\ClientAPI\ObjectiveC\includes\public subfolders into Groups & Files, under the project name.
    3. If prompted to copy existing items into the destination group’s folder, ensure Copy items into destination group’s folder (if needed) is selected and then click Add to copy the include\internal and include\public directories into your project’s folder.
  5. Add the generated *.h and *.m files to the project:
    1. In the Xcode Groups & Files pane, right-click <Project Name>, and create a new group in your project.
    2. Import the generated code into the new group by selecting Add, then Existing Files.
    3. Navigate to the directory that contains the generated code.
    4. Select both the includes and src folders for the generated code. Click Add.
    5. If prompted to copy existing items into the destination group’s folder, ensure Copy items into destination group’s folder (if needed) is selected and then click Add to copy the Generated Code folder into your project’s folder. This step ensures that all .h and .m files are added to the project’s search path.
  6. Add libclientrt.a, libSUPObj.a, and libMO.a to your project.
    1. In the Xcode Groups & Files pane, select and right-click <Project Name> and select Add, then Existing Files.
    2. Navigate to the directory where you copied the libraries.
    3. Select the libclientrt.a, libSUPObj.a, and libMO.a libraries in Finder. Drag the libraries into Xcode under your project's name.
    4. Select Copy items into destination group’s folder (if needed), then click Add.
    Note: The library version should correspond to the configuration you are building. For example, if you are building for a debug version of the simulator, navigate to libs/Debug-iphonesimulator/ to add the libraries.
  7. Add Settings.bundle to the Xcode project:
    1. Select and right-click <Resources>, and select Add, then Existing Files.
    2. Navigate to the includes directory, select Settings.bundle, and add it.
    3. Select Copy items into destination group’s folder (if needed), then click Add.
    Note: This allows the device client user to use the Settings application to input their user preference information, such as server name, server port, user name, and activation code.
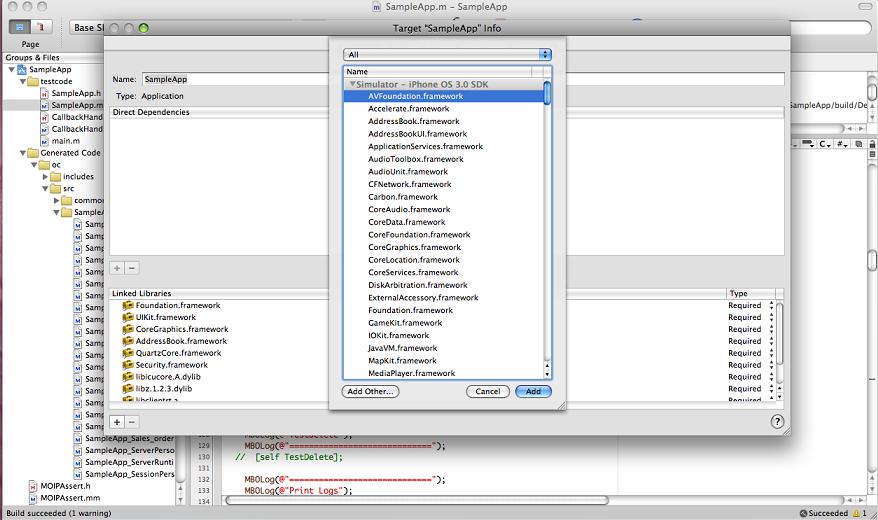
  8. Add the following frameworks from the SDK to the project by selecting Project > Edit Active Target <ProjectName> > General.
    • Security.framework
    • AddressBook.framework
    • QuartzCore.framework
    • CoreFoundation.framework
    • libicucore.A.dylib
    • libz.1.2.3.dylib
    • libstdc++.dylib

    Xcode Linked Libraries
  9. Edit the Xcode project Library Search Paths by selecting Project > Edit Active Target <ProjectName> > Build > Search Paths > Library Search Paths. Specify the path to the location where you copied the libraries in step 6. Remove any libstdc++ paths (such as usr/lib/arm-apple-darwin10/4.2.1) from the library search path.
    1. Edit the Header Search Paths to include the include\internal and include\public directories.
  10. For debug builds, check Build Active Architecture Only, and make sure that the armv6 architecture is selected.
  11. Write your application code to reference the generated MBO code. See Referencing the iOS Client Object API.
Related concepts
Mobile Business Object Code
Deploying Applications to Devices
Related tasks
Task Flow for Xcode IDE Development
Related reference
Developing Applications in the Xcode IDE