Configure the build settings for the Xcode project, then build the project.
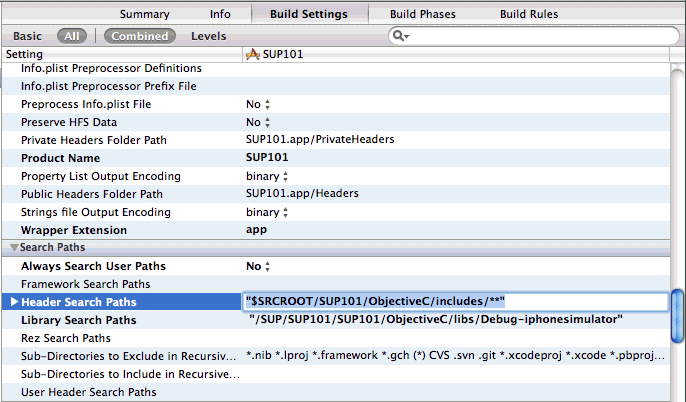
- In the right pane, click the Build Settings tab, then scroll down to the Search Paths section, then enter the location of the iPhone simulator libraries in the Header Search Paths and Library Search Paths fields.$SRCROOT is a macro that expands to the directory where the Xcode project file resides. This tutorial project was created in the /SUP/SUP101 directory.
- In Header Search Paths, enter the path to the ObjectiveC/includes directory. In this example, the path is indicated as "$SRCROOT/SUP101/ObjectiveC/includes/**".
- In Library Search Paths, enter the path to the ObjectiveC/libs/Debug-iphonesimulator directory. In this example, the path is indicated as "$SRCROOT/SUP101/ObjectiveC/libs/Debug-iphonesimulator".
- Since you are setting up this application on the iOS simulator for debugging, scroll down to Preprocessing to add the __DEBUG__ macro to the build settings for the SUP101 target.
- Click Debug to highlight it, then click the + icon that appears once you highlight that field.
- Enter __DEBUG__ (two underscores, DEBUG, two underscores).
The __DEBUG__ macro enables code in MBODebugLogger.m that prints message headers to the simulator console. This feature is useful for debugging many issues, especially with communication between client and server. - In the right pane, select the Build Phases tab, then expand the Link Binary with Libraries section.Click the + icon below the list, select the following libraries, and then click Add to add them from the SDK to the project:
- AddressBook.framework
- CoreFoundation.framework
- libicucore.A.dylib
- libstdc++6.dylib
- libz.1.2.3.dylib
- QuartzCore.framework
- Security.framework
- Select Product > Clean, then Product > Build to test the initial set up of the project. If you correctly followed this procedure, you see a Build Succeeded message.

